In the 19th century, Gouda bakers devised a clever method for reusing bakery scraps by binding them with a spiced syrup, creating the first iterations of Stroopwafel Cookies. This practice of biscuit recycling eventually evolved into the precise, yeast-leavened dough and rich caramel filling we treasure today as a hallmark of Dutch culinary engineering. Historical records suggest these were originally a poor man’s treat, yet the technique required to split a thin, hot waffle in half demonstrates a level of artisan skill that remains impressive. Modern testing confirms that the specific hydration levels used by those early bakers were essential for achieving the necessary structural integrity for the splitting process.

Making authentic Stroopwafel Cookies at home requires a balance of temperature control and specific timing that reflects the methodical nature of traditional Dutch baking. By understanding how the enriched yeast dough interacts with the heat of a waffle iron, we can achieve that classic thin, crisp exterior and chewy, spiced interior. This recipe focuses on the chemistry of the yeast and the emulsification of the syrup to guarantee a professional result. We will use a kitchen scale for precision, honoring the heritage of European baking where weight measurements provide the most reliable outcomes.
The Technical Mastery of the Dutch Stroopwafel
There is a profound satisfaction in mastering the Stroopwafel Cookies, a bake that sits at the intersection of pastry and confectionery. Unlike standard biscuits, the stroopwafel demands an understanding of yeast fermentation and thermal management to achieve the perfect split. You will appreciate the historical context of the spiced ‘stroop’ (syrup), which relies on the scientific principle of sugar concentration to create a bond that remains pliable at room temperature. The contrast between the cinnamon-scented waffle and the deep caramel notes of the filling provides a sensory experience that honors centuries of Dutch tradition. This method proves that historical techniques, when applied with modern precision, produce a texture that mass-produced versions simply cannot replicate.
Print
Stroopwafel Cookies
- Total Time: 2 hours 10 mins
- Yield: 18 cookies
- Diet: Vegetarian
Description
These traditional Dutch treats feature a rich, yeast-leavened dough pressed thin and filled with a spiced caramel syrup. Perfectly balanced with cinnamon and brown sugar, they are designed to be enjoyed over a warm beverage for a truly authentic experience.
Ingredients
- 15 oz All Purpose Flour
- 6 oz Unsalted Butter, melted
- 2.25 tsp Dry Yeast
- 2 oz Whole Milk, warm
- 2 Large Eggs, room temperature
- Granulated Sugar
- 7 oz Dutch Stroop (or blend of light corn syrup and molasses)
- 4 oz Brown Sugar
- 3 oz Unsalted Butter (for filling)
- 1 tsp Ground Cinnamon
- 1/8 tsp Salt
Instructions
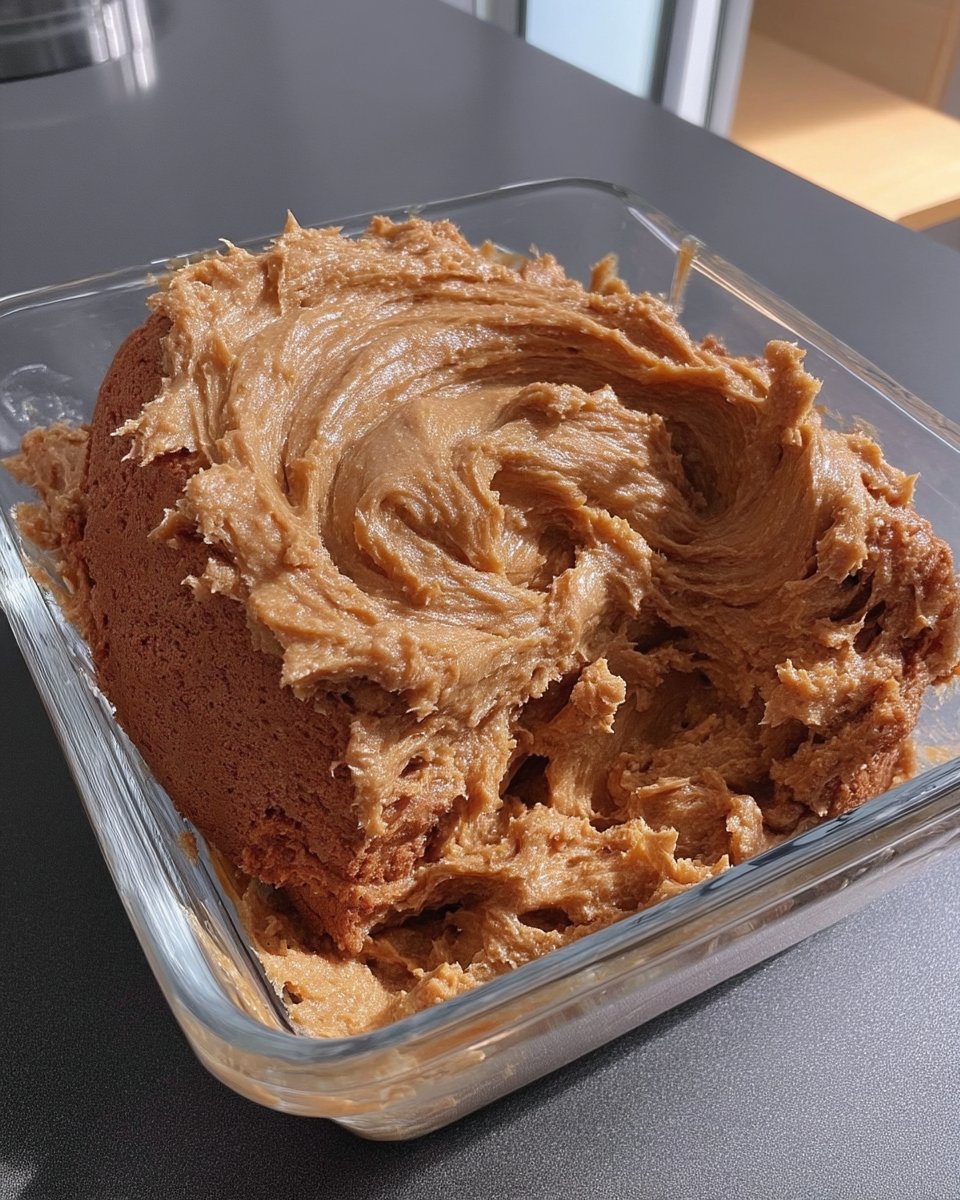
- In a small saucepan over medium heat, combine the Dutch Stroop, brown sugar, 3 oz butter, cinnamon, and salt, stirring until emulsified and just boiling; remove from heat and let cool.
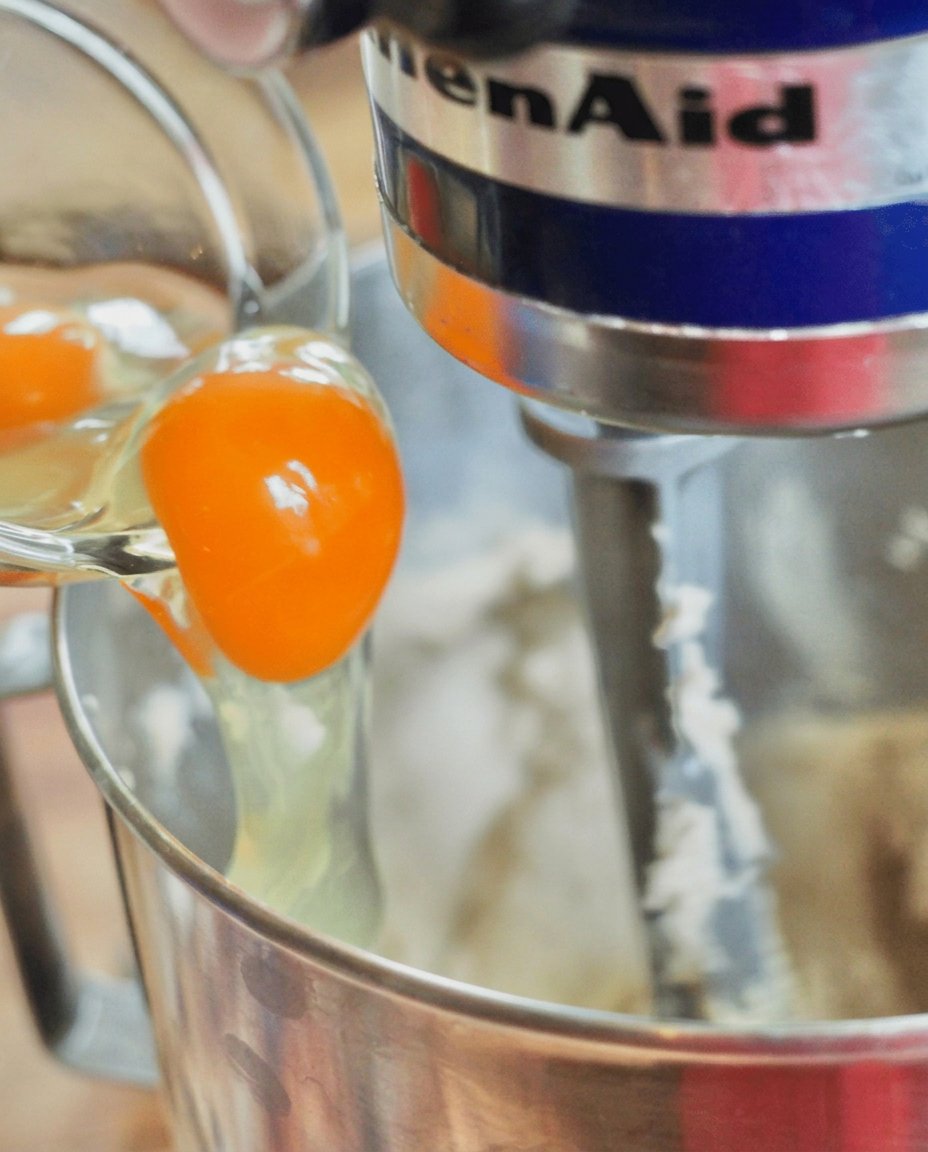
- Dissolve the yeast in warm milk in a stand mixer bowl, then mix in the eggs, melted butter, and granulated sugar on low speed.
- Methodically add the cinnamon and 15 oz of flour, mixing until just incorporated, then knead on a floured surface until smooth.
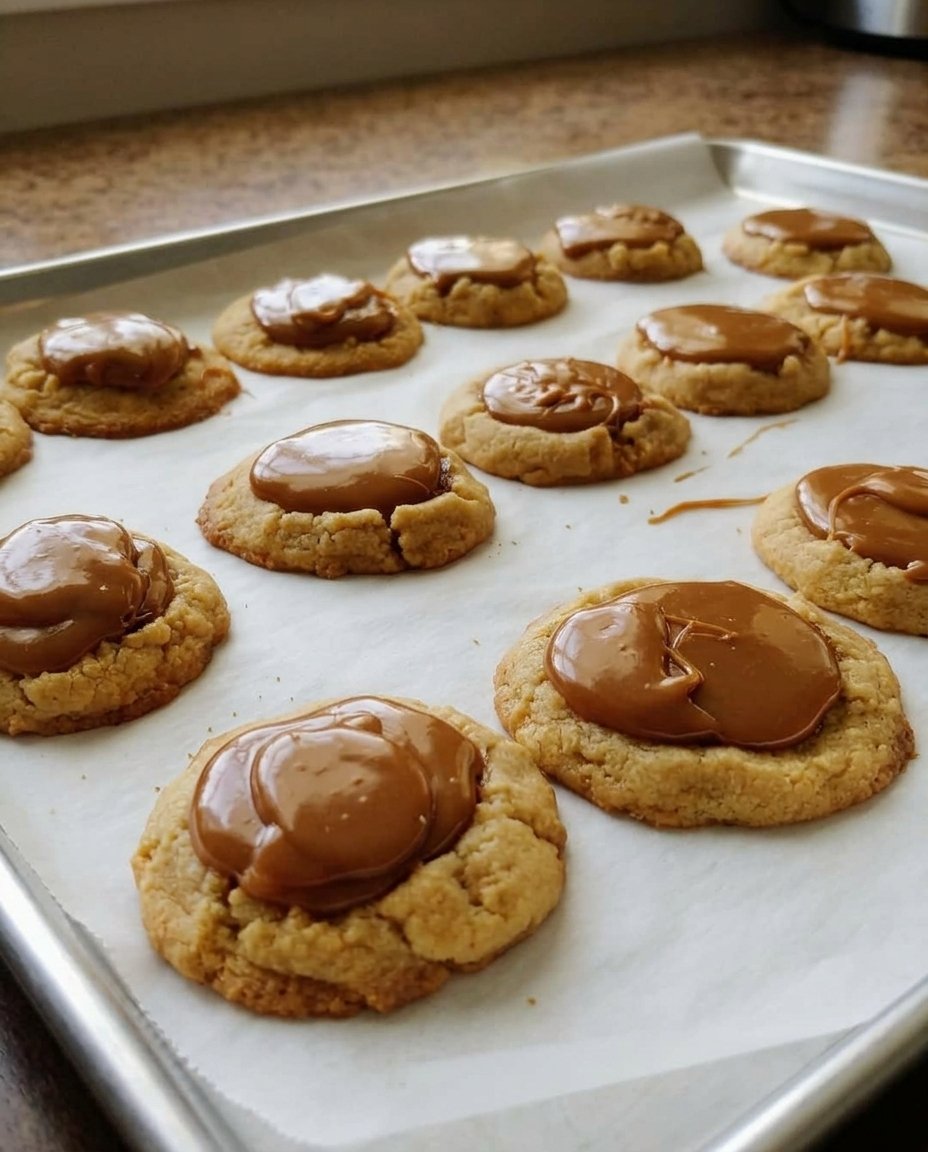
- Divide the dough into 18 equal pieces (approx. 50g each), roll into balls, and allow to rest on a sheet pan covered in plastic for one hour.
- Place a dough ball in a preheated waffle iron and bake for 2-3 minutes until golden brown.
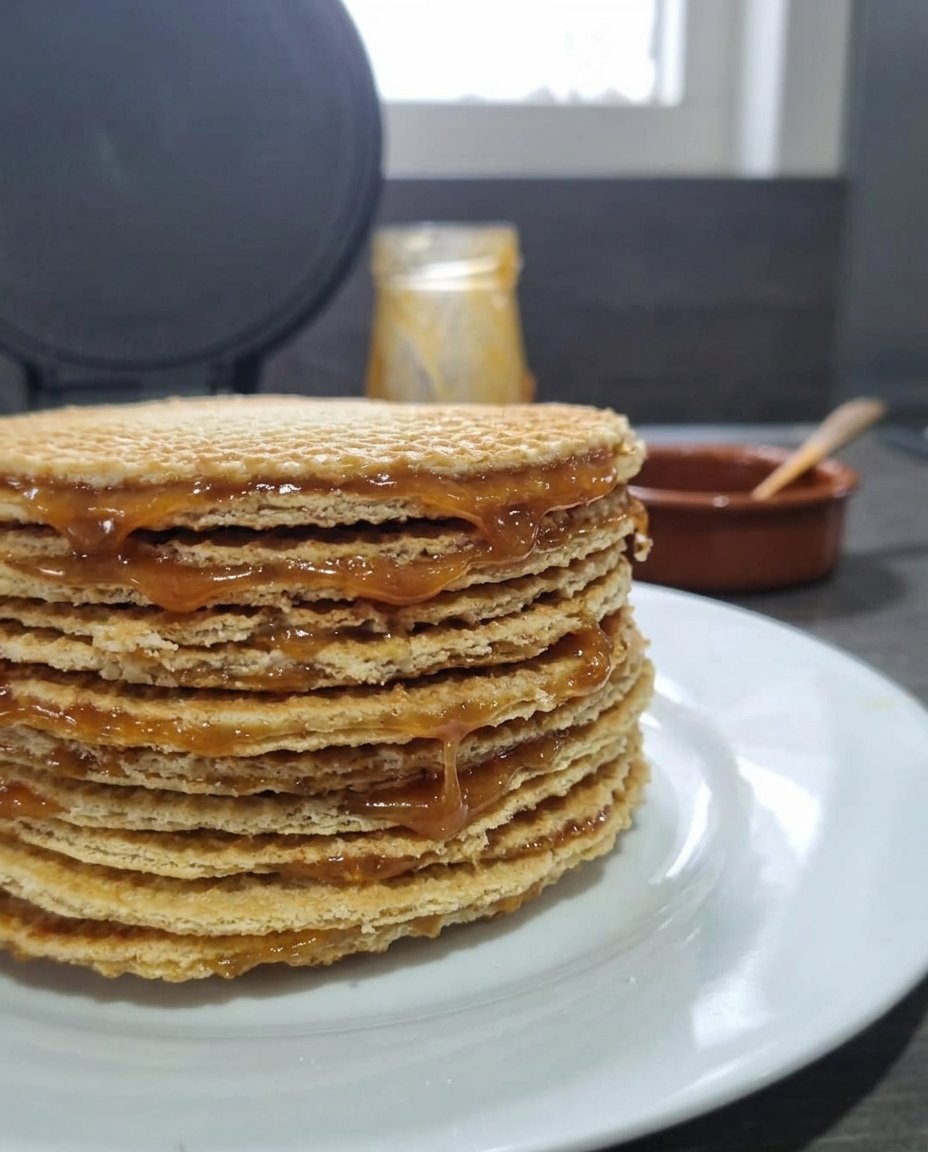
- Remove the waffle and immediately use a thin, sharp blade to split it horizontally while still hot and pliable.
- Spread a tablespoon of the warm filling inside one half, press the other half on top, and let the syrup set as it cools.
Notes
To prevent the cookies from crumbling, always split them the moment they leave the waffle iron while the internal steam is still present. If your caramel filling begins to harden before you finish the batch, gently reheat it over a water bath to maintain a spreadable consistency.
- Prep Time: 1 hour 20 mins
- Cook Time: 50 mins
- Category: Dessert
- Method: Waffle Iron
- Cuisine: Dutch
The Technical Composition of Stroopwafel Cookies
Achieving the correct structure for these waffles depends entirely on the quality and ratio of the components used. Traditional Dutch baking relies on high-fat ratios and specific sugars to manage both the elasticity of the dough and the viscosity of the filling. Below are the essential elements required for success.
The Enriched Waffle Dough
- All Purpose Flour (15 oz): This provides the gluten structure necessary to withstand the pressure of the waffle iron and the splitting process.
- Unsalted Butter (6 oz): Melted butter creates a tender crumb and a rich flavor profile consistent with historical Dutch recipes.
- Dry Yeast (2.25 tsp): Unlike most cookies, stroopwafels use yeast for a subtle lift and a distinct fermented flavor that balances the sweetness.
- Whole Milk (2 oz): Warm milk activates the yeast and contributes to the soft, pliable nature of the warm dough.
- Granulated Sugar & Cinnamon: These provide the foundational flavor and aid in the Maillard reaction, giving the waffle its golden-brown hue.
The Spiced Stroop Filling
- Dutch Stroop (7 oz): This is the soul of the cookie; if unavailable, a blend of light corn syrup and molasses serves as a functional scientific substitute.
- Brown Sugar (4 oz): The molasses content in brown sugar aids in the chewiness and depth of the caramelization.
- Ground Cinnamon & Salt: These sharpen the flavor profile, preventing the sugar from becoming cloying while honoring the spice trade history of the Netherlands.
Technique matters as much as the ingredients themselves. Using a kitchen scale for these measurements is not just a preference; it is a requirement for the structural success of such a thin, delicate bake.
The Proper Method for Traditional Construction
Step 1: Emulsifying the Stroop Filling
Combine 7 oz Dutch Stroop, 4 oz brown sugar, 3 oz unsalted butter, 1 teaspoon ground cinnamon, and 1/8 teaspoon salt in a small saucepan. Cook over medium heat, stirring constantly to verify that the butter and sugar have fully emulsified into the syrup. Once the mixture reaches a gentle boil, remove it from the heat immediately to prevent over-concentration of the sugars. Transfer the filling to a heat-proof bowl and allow it to cool to a warm, spreadable consistency while you prepare the dough.
Step 2: Activating the Yeast and Mixing
Combine the warm milk and dry yeast in the bowl of a stand mixer, allowing it to sit for a few minutes until the yeast is fully dissolved. Incorporate the room-temperature eggs, melted butter, and granulated sugar, mixing on a low setting to avoid premature gluten development. Methodically add the cinnamon and salt, followed by the 15 oz of all-purpose flour. Mix until the flour is just incorporated, which maintains the tender structure of the final waffle.
Step 3: Kneading and Fermentation
Turn the soft dough onto a lightly floured surface and knead gently into a smooth ball. The dough will be significantly softer than standard cookie dough due to the high fat and moisture content. Divide the dough into 18 equal pieces, approximately 50g each, using a kitchen scale for absolute precision. Roll each piece into a tight ball and arrange them on a sheet pan; cover with plastic wrap and allow them to rest for one hour. This resting period is crucial as it relaxes the gluten and allows the yeast to begin its work, which is essential for the waffle’s expansion.
Step 4: The Precision Press and Split
Preheat your waffle iron to a medium-high setting. Flatten a dough ball into a disc and place it in the center of the iron, closing it firmly to create a thin, even layer. Bake for 2-3 minutes until the waffle is golden brown and the steam has largely subsided. Remove the waffle with a fork and immediately use a thin, sharp blade to split the waffle horizontally while it is still hot and pliable. This window of opportunity is brief—if the waffle cools too much, the internal structure will set and crumble upon contact with the blade.
Step 5: Filling and Finishing
Generously spread approximately one tablespoon of the warm stroop filling onto the inside of one half of the split waffle. Place the second half on top and press gently to distribute the syrup to the edges. As the waffle cools, the syrup will set, creating the iconic chewy bond that defines this classic treat. Repeat this process with the remaining dough balls, working quickly to maintain the temperature of both the waffles and the filling.
Jordan’s Precision Notes for Successful Splitting

Historical bakers understood that the humidity of the kitchen influenced the flexibility of the waffle, a principle we can verify today through temperature control. To achieve the perfect split, you must use a knife with a very thin, straight blade—a small offset spatula or a sharp paring knife works best. Work on a flat wooden surface which absorbs less heat than stone, keeping the waffle pliable for those few extra seconds. If your filling becomes too thick as it cools, gently reheat it over a water bath to maintain a spreadable viscosity. For more guidance on managing complex doughs, examine our Efficient Cookie Methods to refine your kitchen workflow. Furthermore, understanding the traditional Dutch methods for handling syrup can prevent the filling from becoming too brittle or too runny.
Regional Adaptations and Scientific Variations
While the Gouda tradition is the gold standard, regional variations often incorporate different spice profiles or coatings. Some Belgian versions use a heavier pearl sugar in the dough, though this changes the structural integrity required for splitting. You might consider dipping half of the finished cookie into tempered dark chocolate, a modern addition that complements the cinnamon and caramel notes perfectly. Another popular variation involves replacing the traditional stroop with a honey-based syrup, which provides a lighter, floral flavor profile while maintaining the necessary sugar concentration. If you enjoy experimenting with seasonal flavors, you can find inspiration in our Holiday Cookie Science guide, which examines how different inclusions affect dough stability.
The Traditional Ritual of the Stroopwafel
To honor the heritage of this bake, one should serve Stroopwafel Cookies alongside a piping hot cup of black coffee or Earl Grey tea. The diameter of the waffle is historically designed to rest perfectly on the rim of a standard teacup, allowing the steam to soften the caramel filling. This ritual is not merely for aesthetics; it is a functional part of the tasting experience that improves the texture of the syrup. For those hosting a formal gathering, serving these on vintage Delftware adds a touch of historical authenticity to the presentation. To learn more about the aesthetics of traditional service, see our notes on Precision Cookie Decorating which covers the visual appeal of classic bakes.
The Technical Truth of Dutch Baking
Mastering Stroopwafel Cookies is a testament to a baker’s commitment to both history and precision. By respecting the fermentation of the yeast and the timing of the split, you have recreated a piece of culinary history that has survived centuries for a reason. This recipe reminds us that the most rewarding bakes are often those that require the most focus and technical understanding. To continue building your repertoire of classic techniques, examine our Foundation Cookie Recipes for more methodical guides. We invite you to share your results with our community of dedicated bakers on Facebook, Instagram, and Pinterest.

