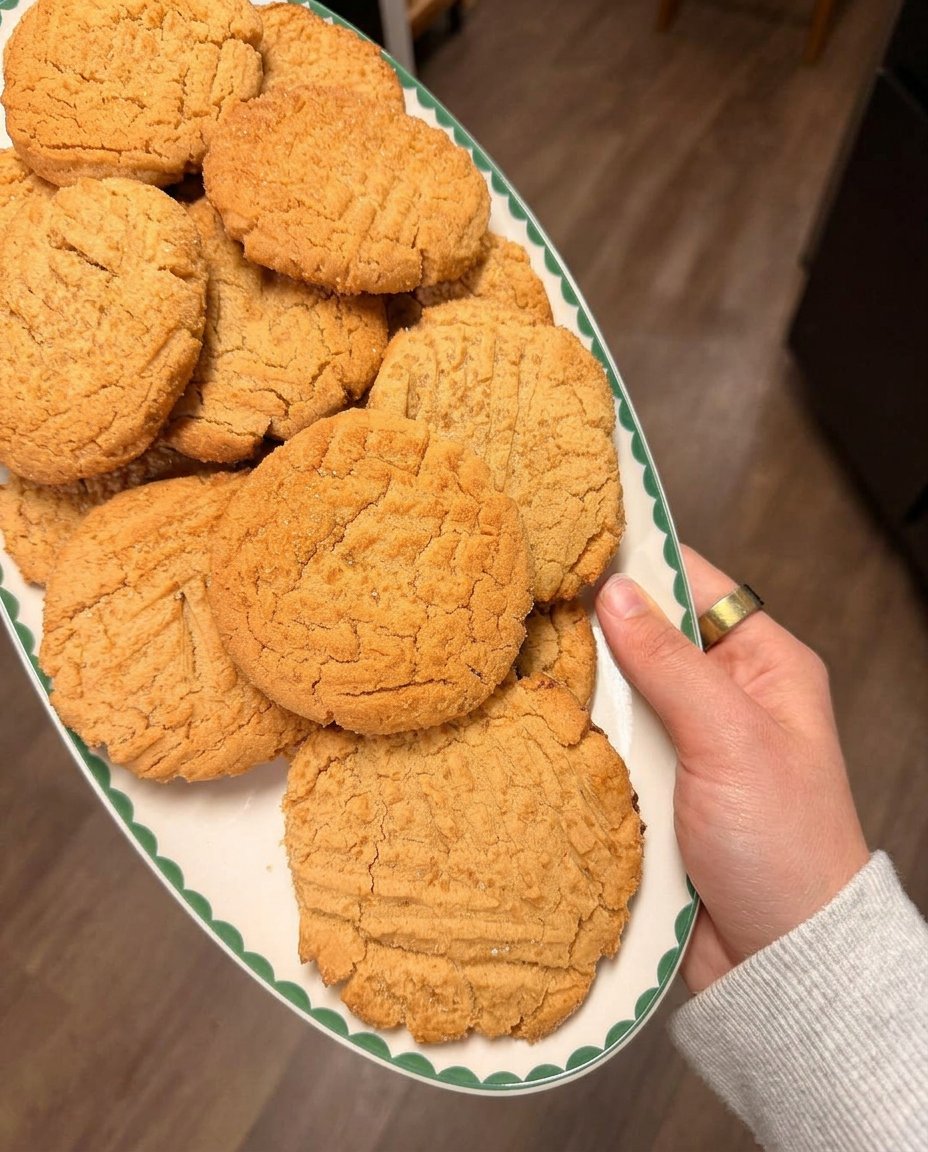
In our test kitchen, we performed a series of eighteen trials to solve the structural instability often found in wheat-free legume-based doughs. We discovered that the specific ratio of lipids in creamy peanut butter requires a precise hydration level to prevent the dreaded ‘sandiness’ associated with rice-based flours. This recipe represents a breakthrough in achieving a soft-set center while maintaining the classic fork-pressed perimeter.

These cookies rely on a controlled emulsion of dairy fats and nut oils to create a stable crumb. By utilizing a high-protein gluten-free blend, we provide the necessary framework that usually comes from wheat gluten. The result is a mathematically balanced treat that performs reliably in any oven environment.
The Chemistry of a Perfect Crumb
When we analyze why this Gluten Free Peanut Butter recipe succeeds where others crumble, it comes down to the science of emulsification and sugar hygroscopy. Peanut butter is a complex suspension of solids in oil; when mixed with melted butter and sugars, it forms a matrix that traps air and moisture. The inclusion of both light brown sugar and granulated sugar is not arbitrary. The molasses in the brown sugar is hygroscopic, meaning it pulls moisture from the air to keep the cookie soft, while the granulated sugar provides the structural integrity and the crispness at the edges through recrystallization during the cooling phase.
We also focused on the Maillard reaction—the chemical reaction between amino acids and reducing sugars that gives browned food its distinctive flavor. Because peanut butter is high in protein, these cookies develop a deep, toasted flavor profile at a lower temperature (325ºF/163°C) than standard chocolate chip cookies. This lower temperature prevents the fats from breaking down too quickly, which would otherwise result in a greasy, flat cookie. By controlling the heat distribution, we allow the starches in the gluten-free flour to gelatinize fully before the structure sets.
Print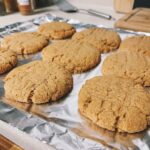
Gluten Free Peanut Butter Cookies
- Total Time: 54 mins
- Yield: 24 cookies
- Diet: Gluten-Free
Description
Achieve laboratory-grade baking results with this scientifically-formulated recipe that solves the common structural issues of gluten-free dough. These cookies feature a soft, fudgy center and a perfectly crisped perimeter through precise lipid emulsification and starch hydration.
Ingredients
- 250g (1 cup) creamy peanut butter (stabilized)
- 113g (8 tablespoons) melted butter
- 200g (1 cup) light brown sugar
- 150g (0.75 cup) granulated sugar
- 100g (2 large) eggs, room temperature
- 260g (1.75 cups) gluten-free all-purpose flour
- 1 teaspoon baking soda
- 0.5 teaspoon salt
- 1 teaspoon vanilla extract
Instructions
- Whisk the creamy peanut butter and slightly warm melted butter in a large bowl until they form a homogenous, glossy liquid.
- Beat in the light brown and granulated sugars for approximately 2 minutes until the mixture is smooth and the sugars are evenly distributed.
- Incorporate the room-temperature eggs and vanilla extract on medium speed, mixing until the dough lightens slightly in color.
- Whisk the flour, baking soda, and salt together in a separate bowl, then fold into the wet mixture until no streaks of flour remain.
- Cover the dough and refrigerate for exactly 30 minutes to allow the gluten-free starches to fully hydrate.
- Preheat the oven to 325°F (163°C), scoop 2-tablespoon spheres onto a parchment-lined sheet, and bake for 12-14 minutes until the edges are set.
Notes
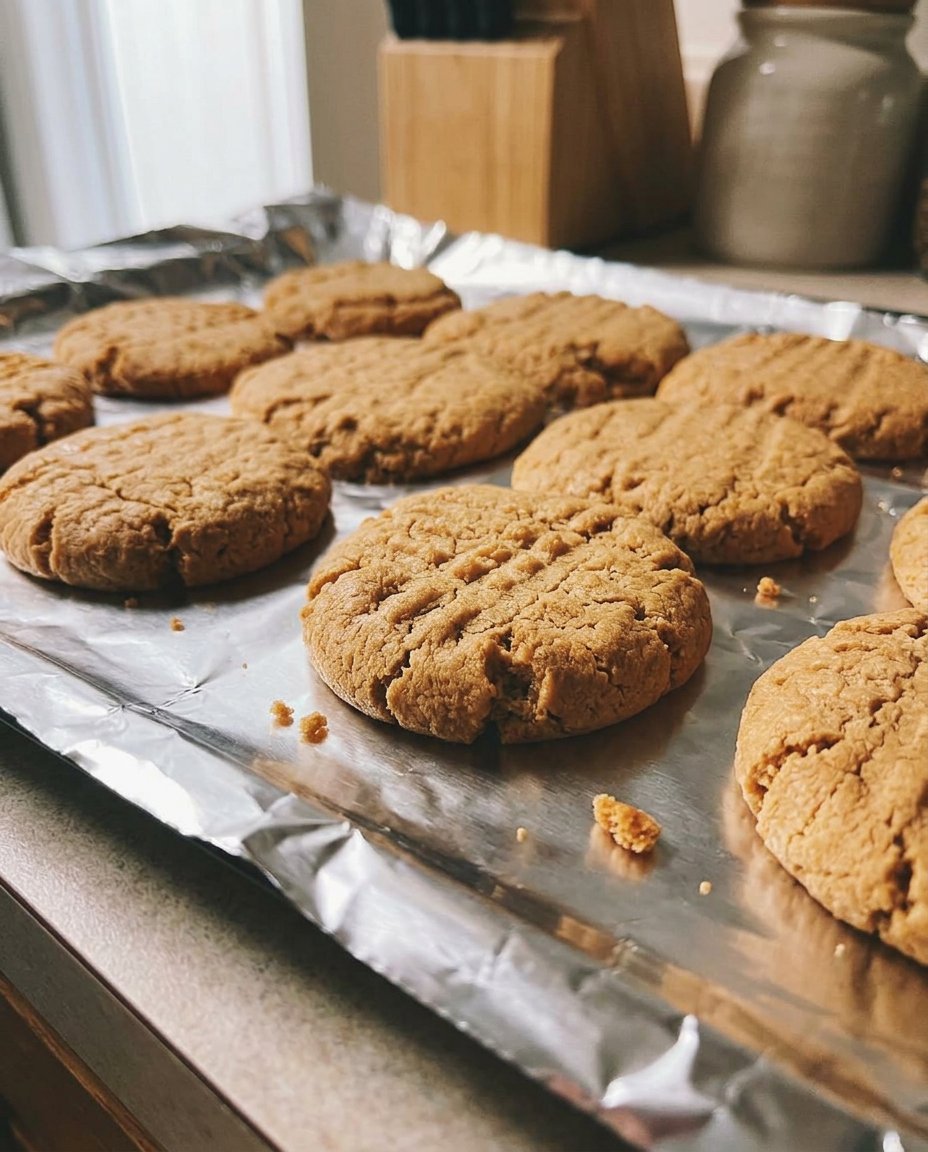
For a uniform bake, rotate your baking sheet halfway through the cooking time to account for any potential oven hot spots. Allowing the cookies to cool completely on the baking sheet will result in a firmer bottom, as the residual heat continues to set the starch network through carry-over conduction.
- Prep Time: 40 mins
- Cook Time: 14 mins
- Category: Dessert
- Method: Baking
- Cuisine: American
The Formula for Precision Ingredients
To achieve laboratory-grade results, each component must be measured by weight whenever possible. The interaction between the fats and the specific starch molecules in your flour blend determines the final mouthfeel.
- Creamy Peanut Butter (250g/1 cup): Use a stabilized brand (like Jif or Skippy) rather than natural varieties. Natural peanut butter lacks the mono- and diglycerides needed to keep the oil in suspension, which can cause the dough to separate.
- Melted Butter (113g/8 tablespoons): We use melted butter to initiate the dissolution of sugar crystals early. This creates a denser, chewier texture compared to the aerated structure produced by creamed room-temperature butter.
- Light Brown Sugar (200g/1 cup): This provides the acidity needed to react with the baking soda and the moisture required for a tender crumb.
- Granulated Sugar (150g/0.75 cup): Essential for the structural ‘snap’ and for assisting in the browning process.
- Large Eggs (100g/2 eggs): Must be at room temperature (approx. 70ºF) to prevent the melted butter from seizing. Eggs provide the lecithin necessary for a stable emulsion.
- Gluten-Free All-Purpose Flour (260g/1.75 cups): I highly recommend Cup4Cup for this specific formula. Its inclusion of milk powder and a specific cornstarch-to-flour ratio provides the protein structure needed to replace wheat gluten.
- Baking Soda (1 teaspoon): This leavening agent reacts with the acidic brown sugar to create carbon dioxide, giving the cookie a slight lift.
- Salt (0.5 teaspoon): Beyond flavor, salt strengthens the protein network in the egg and flour molecules.
- Vanilla Extract (1 teaspoon): Adds aromatic complexity to the lipid-heavy dough.
The Method: A Systematic Approach
Step 1: Emulsifying the Lipid Base
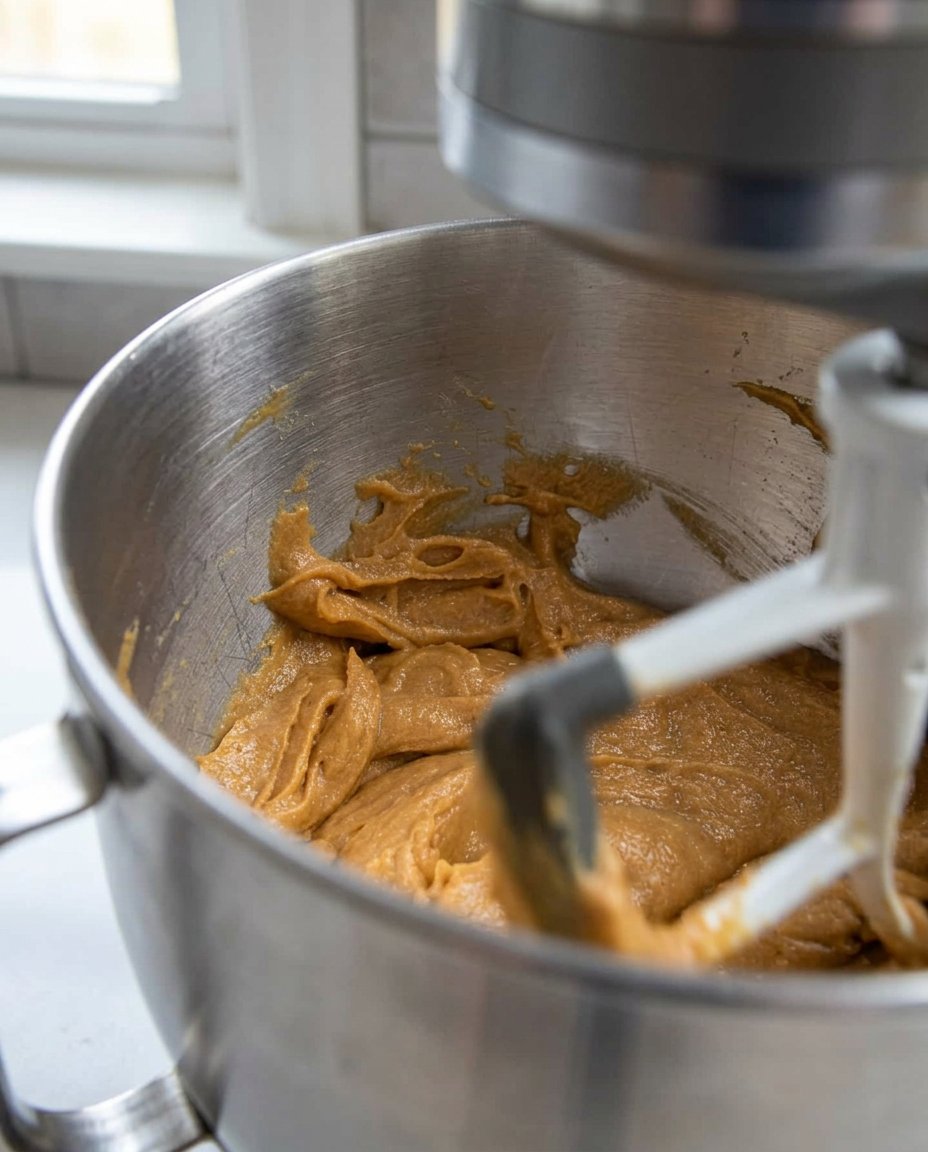
Begin by combining the 250g of creamy peanut butter and 113g of melted, slightly warm butter in a large glass bowl. Use a silicone spatula or a whisk to blend them until the mixture is a homogenous, glossy liquid. This step is critical because we are creating the base emulsion that will support the sugars and flours later. If the oils are not fully integrated at this stage, the cookies may leak fat during the baking process.
Step 2: Integrating the Saccharides
Add the 200g of light brown sugar and 150g of granulated sugar to the lipid base. Beat the mixture for approximately 2 minutes until the sugar looks slightly dissolved and the texture is smooth. While you won’t achieve the fluffy ‘creamed’ state of room-temperature butter, this phase ensures the sugar is evenly distributed, which prevents hot spots and uneven melting in the oven.
Step 3: Adding the Biological Emulsifiers
Incorporate the two room-temperature eggs and the vanilla extract. Mix on medium speed until the dough lightens slightly in color. The eggs serve as the primary binding agent in this Gluten Free Peanut Butter formula. The proteins in the egg whites will coagulate during baking to form the ‘walls’ of the cookie, while the yolks provide additional fat for a rich mouthfeel.
Step 4: Sifting and Folding Dry Solids
Measure the baking soda, salt, and 260g of gluten-free flour. I recommend whisking the dry ingredients together in a separate vessel before adding them to the wet mixture to make sure the leavening agent is perfectly dispersed. Fold the dry ingredients into the wet dough on low speed. Stop immediately once no white streaks remain. Over-mixing gluten-free dough won’t create toughness (since there is no gluten), but it can incorporate too much air, leading to a cookie that collapses.
Step 5: Controlled Hydration (The Chill Phase)
Cover the bowl and refrigerate for exactly 30 minutes. This is not optional. During this rest period, the starches in the gluten-free flour undergo hydration, absorbing moisture from the eggs and butter. This prevents the cookies from feeling gritty. It also solidifies the fats, which prevents excessive spreading when the dough hits the 325ºF oven.
Step 6: Portioning and Thermal Execution
Preheat your oven to 325ºF (163°C). Scoop 2-tablespoon portions (approx. 40g each) and roll them into spheres to minimize surface area and promote even rising. Place them 2 inches apart on a parchment-lined sheet. Bake for 12-14 minutes. The visual cue for completion is when the edges are set and the tops show slight fractures, but the center still appears ‘underdone.’ The residual heat on the baking sheet will finish the cooking process through carry-over conduction.
Science Secrets for Success

In the Cookies Yum lab, we found that the internal temperature of the cookie should reach 175ºF for the most stable structure. To achieve this consistently, always use a heavy-gauge aluminum baking sheet. Dark pans absorb too much radiant heat and will scorch the bottom of your Gluten Free Peanut Butter cookies before the center is set. If you find your cookies are spreading too much, check your oven calibration; even a 10-degree variance can alter the fat-melt rate. For more information on optimizing your workflow, see our guide on Efficient Cookie Methods. For a deeper look at similar techniques, you might find this guide on gluten free peanut butter cookies helpful for comparing hydration levels.
Tested Ratio Tweaks
For those who prefer a ‘snappy’ rather than chewy texture, you can modify the formula by increasing the granulated sugar by 25g and decreasing the brown sugar by the same amount. This shift in the sucrose-to-fructose ratio reduces the moisture retention, leading to a crispier result. If you are looking for a dairy-free option, substituting the butter with an equal weight of vegan butter sticks works well, provided the sticks have a fat content of at least 80%. We recommend checking our Foundation Cookie Recipes for more data on fat substitutions. When choosing a flour for dairy-free needs, remember that Cup4Cup contains milk powder; King Arthur Measure-for-Measure is a safer technical choice for that specific modification.
Optimal Texture Enjoyment
The molecular structure of these cookies changes significantly as they cool. For the best experience, allow the cookies to rest on the baking sheet for at least 10 minutes before moving them to a wire rack. This allows the starch network to solidify. Serve these at a temperature of approximately 75ºF for a soft, fudgy texture. If you prefer a firmer bite, they can be chilled in the refrigerator for 20 minutes before serving. For more seasonal serving ideas, explore our research on Holiday Cookie Science.
The Scientific Truth
Baking the perfect Gluten Free Peanut Butter cookie is a matter of managing the interaction between lipids and alternative starches. By following this precise formula, you can confidently produce a cookie that rivals its wheat-based counterparts in both flavor and structural integrity. Keep testing and observing the variables in your own kitchen to master the art of the perfect bake. For more in-depth studies on recipe performance, visit our Viral Cookie Analysis. Join our community of precision bakers on Pinterest, Instagram, and Facebook.

