Victorian era bakers recognized that lemon zest provided a potent flavor profile that outperformed juice in high-heat environments. This classic approach for Lemon Glazed Cookies 2 relied on the volatile oils found in the citrus flavedo to provide a stable aromatic base. Modern testing confirms that these oils resist evaporation more effectively than the acidic juice alone, providing a depth of flavor that remains after the bake.

This recipe demonstrates how proper emulsion creates a soft, stable crumb without the need for extended refrigeration. By managing the temperature of your lipids and the duration of mechanical aeration, you achieve a consistent spread and a delicate texture. We have tested this method to provide home bakers with a reliable, professional result using historical precision.
The Tradition of Lemon Glazed Cookies 2
The appeal of these biscuits lies in their scientific simplicity and historical grounding. In the 19th century, citrus was a luxury, and using every part of the fruit was a mark of a skilled household. This recipe honors that tradition by concentrating the lemon oils within the dough and using the acidic juice for a sharp, crystalline glaze. The result is a balance of textures—a soft, buttery interior contrasted with a crisp, sweet topping.
Unlike modern recipes that rely on heavy leavening or artificial extracts, this method uses the mechanical power of the creaming process to create lift. This results in a tighter, more refined crumb structure that is reminiscent of high-end British tea biscuits. The lack of a chilling step is not a shortcut; rather, it is a testament to the structural integrity of the fat-to-sugar ratio used here. By following these precise measurements, you produce a cookie that is both heritage-rich and technically sound.
Print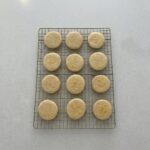
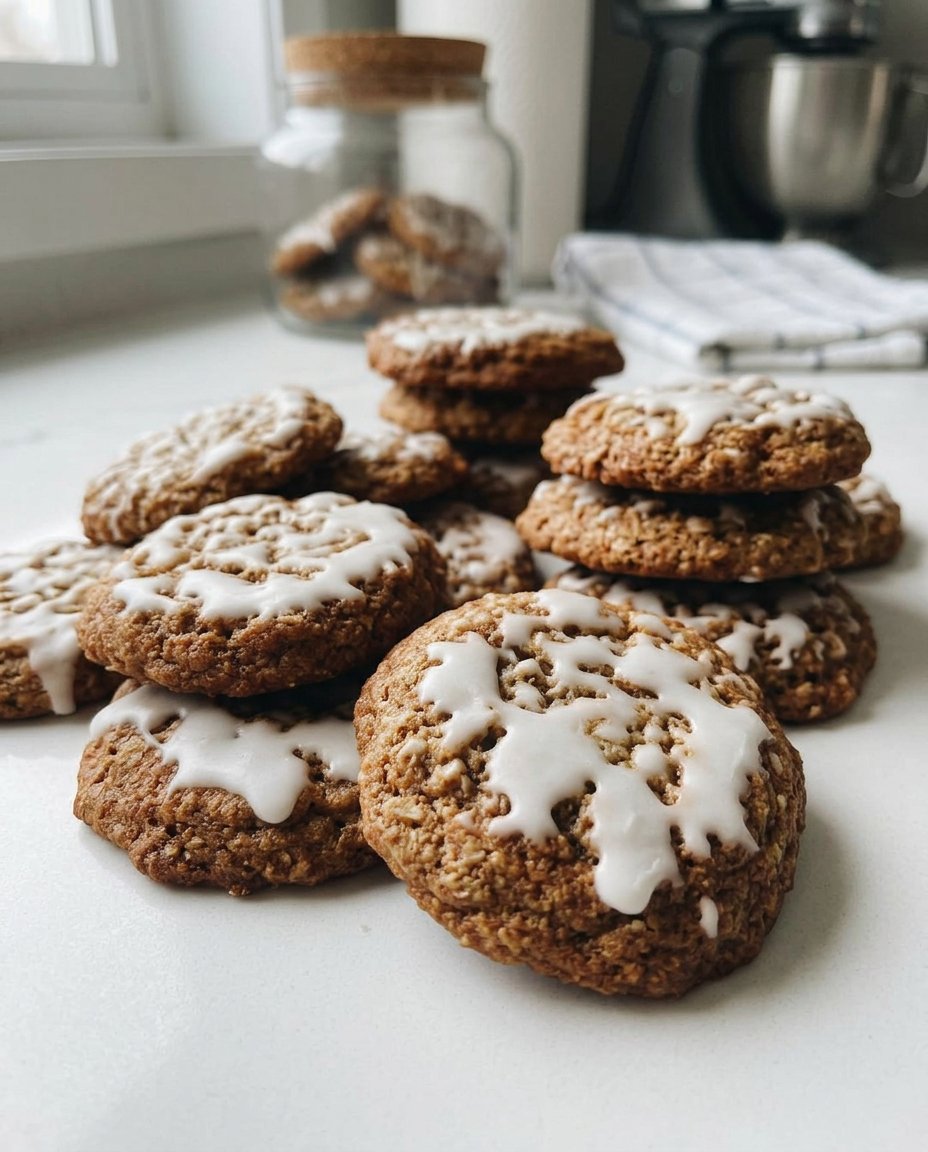
Lemon Glazed Cookies 2
- Total Time: 1 hour 4 mins
- Yield: 24 cookies
- Diet: Vegetarian
Description
These heritage-inspired biscuits combine a tender, buttery crumb with a vibrant, acidic glaze. By utilizing traditional creaming methods and fresh lemon zest, they deliver a sophisticated citrus flavor perfect for afternoon tea.
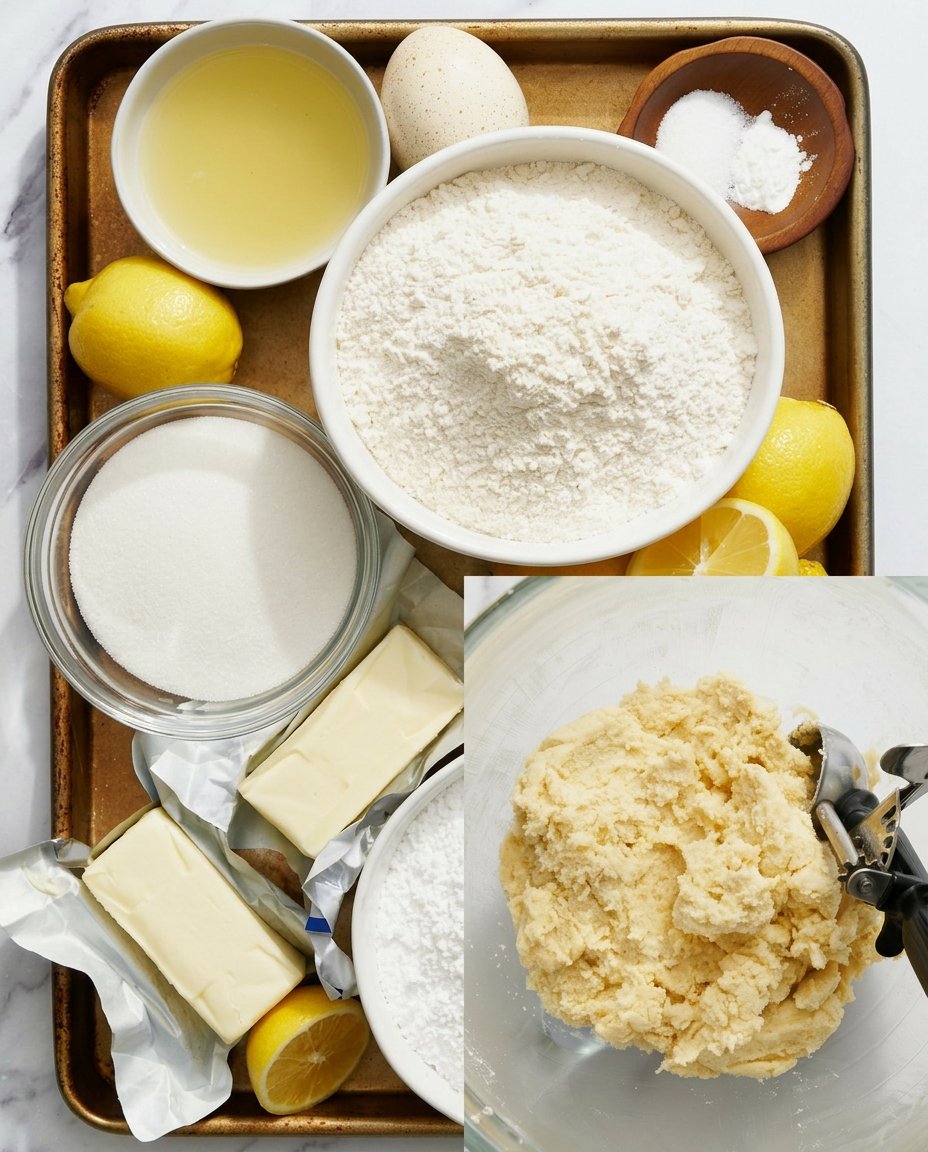
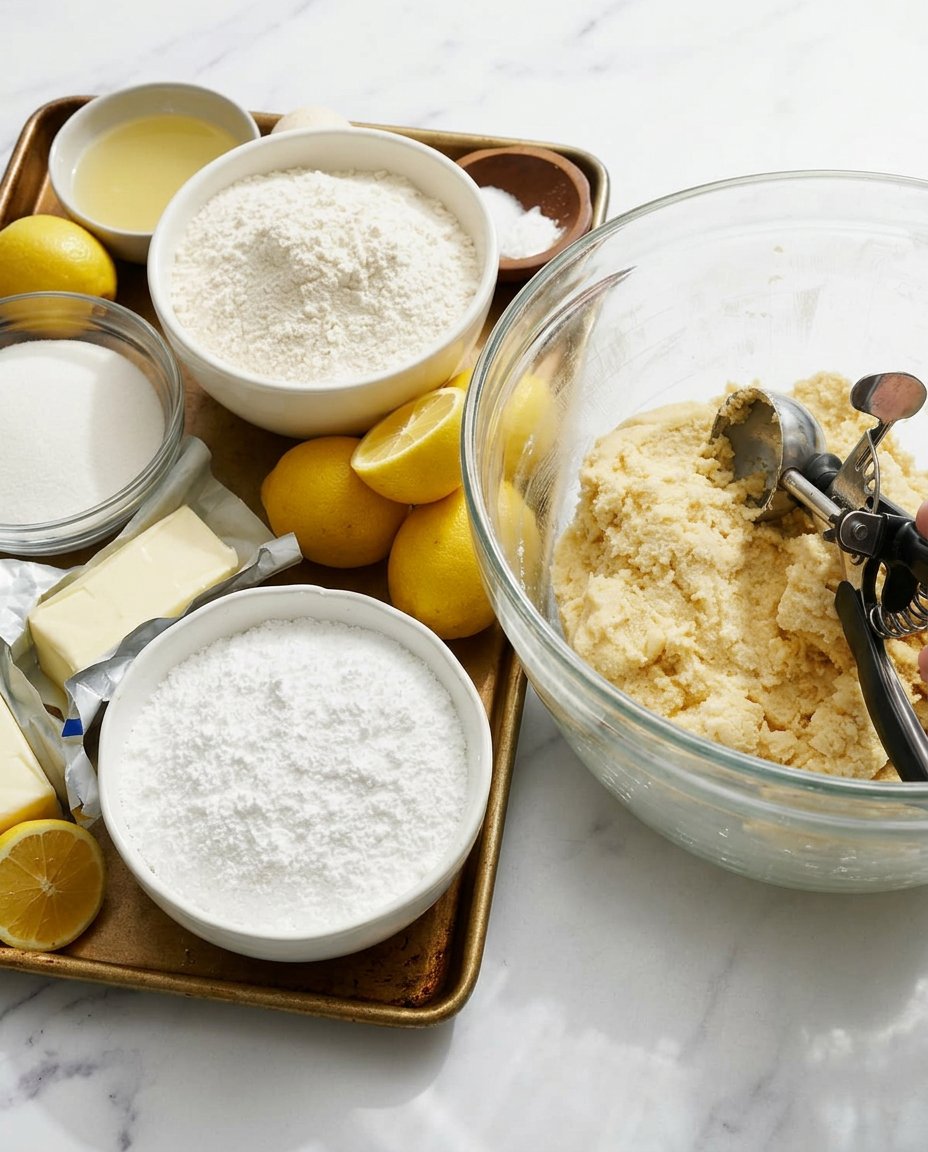
Ingredients
- 227g Unsalted Butter, cool room temperature
- 150g Granulated Sugar
- 2 tbsp Lemon Zest (from approx. 3 lemons)
- 1 Large Egg, cool room temperature
- 286g All-Purpose Flour
- 1/2 tsp Baking Powder
- 1/2 tsp Fine Sea Salt
- 1 cup Powdered Sugar, sifted
- 2–3 tbsp Fresh Lemon Juice
Instructions
- Preheat oven to 350°F (175°C) and line two baking sheets with parchment paper.
- In a medium bowl, whisk together the flour, baking powder, and sea salt until well distributed.
- In a large bowl, cream the butter, granulated sugar, and lemon zest for 3 to 4 minutes until the mixture is pale and ivory-colored.
- Add the egg and beat for another minute until the mixture is fully emulsified, scraping down the sides of the bowl.
- Set the mixer to low speed and add the flour mixture, blending only until the white streaks disappear.
- Portion 1.5-tablespoon balls, roll them briefly in your palms, and place on sheets, flattening each to 1/3-inch thickness.
- Bake for 12 to 14 minutes until edges are light golden brown; allow to rest on the sheet for 5 minutes before moving to a wire rack.
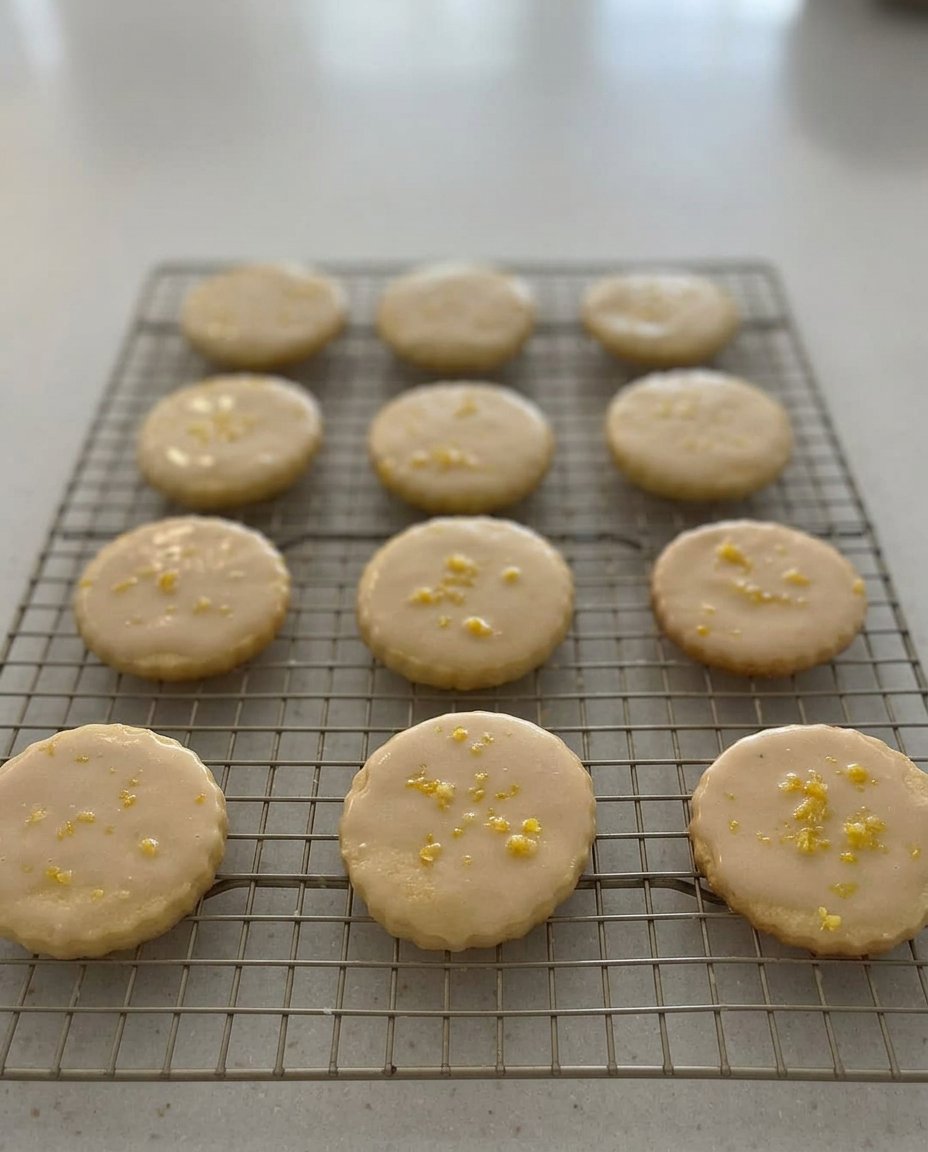
- Whisk the sifted powdered sugar with lemon juice until it reaches a ribbon consistency, spoon over cooled cookies, and let set for 30 minutes.
Notes
To ensure the perfect texture, avoid overworking the dough once the flour is added, as this can lead to a tough biscuit. If your kitchen is particularly warm, you may want to briefly rest the shaped dough in the refrigerator to maintain the historical structural integrity during the bake.
- Prep Time: 20 mins
- Cook Time: 14 mins
- Category: Dessert
- Method: Baking
- Cuisine: British
Proper Components for Technical Success
To achieve the specific texture required for these Lemon Glazed Cookies 2, we must focus on the quality and temperature of our ingredients. The following components have been selected for their chemical roles in the baking process:
- Unsalted Butter (227g): This must be at a cool room temperature, approximately 18°C (65°F). At this temperature, the butter possesses the plasticity required to trap air during the creaming stage while remaining firm enough to prevent excessive spread.
- Granulated Sugar (150g): Beyond sweetness, the jagged crystals of granulated sugar cut through the butter fat to create micro-bubbles. This is a fundamental Victorian technique that provides the only significant aeration in the absence of heavy chemical leaveners.
- Lemon Zest (2 tbsp): We use the zest from three medium lemons to capture the essential oils. These oils, specifically limonene and citral, are fat-soluble and integrate into the butter, spreading the flavor throughout the entire crumb.
- All-Purpose Flour (286g): A protein content of 10-11% is ideal. This provides enough structure to hold the shape while the high fat content inhibits excessive gluten development, making the biscuit tender.
- Baking Powder and Sea Salt: A small amount of baking powder (1/2 tsp) provides a secondary lift as the cookies reach internal temperatures in the oven, while the fine sea salt acts as a flavor potentiator.
- Powdered Sugar and Fresh Juice: The glaze uses sifted powdered sugar to create a smooth, opaque finish. Freshly squeezed juice provides the necessary acidity to cut through the sweetness of the base.
The Proper Method Step by Step
Step 1: Thermal Preparation and Pan Lining
Preheat your oven to 350°F (175°C). Use an oven thermometer to verify the accuracy of your appliance, as even a 10-degree variance can alter the Maillard reaction and the final spread of the biscuit. Line two heavy-duty baking sheets with parchment paper to provide a non-stick surface and a slight buffer against bottom-heat intensity.
Step 2: Sifting Dry Components
In a medium bowl, whisk together the flour, baking powder, and fine sea salt. This action serves two purposes: it removes any clumps from the flour and provides a preliminary distribution of the leavening agent. This step reflects the precision of 19th-century bakers who would have passed their dry ingredients through fine silk sieves.
Step 3: Mechanical Aeration and Maceration
In a large bowl, use an electric mixer with a paddle attachment to beat the cool butter, granulated sugar, and lemon zest. Perform this for 3 to 4 minutes on medium speed. You will observe the mixture transition from a dense yellow to a pale, ivory-colored fluff. This is the moment where air is trapped and the sugar macerates the zest, releasing the citrus oils directly into the fat.
Step 4: Emulsifying the Egg
Add the large egg, which should also be at a cool room temperature. Beat for another minute until the mixture is fully emulsified. If the egg is too cold, it will break the butter emulsion, resulting in a curdled appearance and an uneven bake. Scrape down the sides of the bowl to confirm every gram of fat is incorporated.
Step 5: Incorporating the Flour
Set the mixer to the lowest speed and add the flour mixture. Blend only until the white streaks disappear. The dough will appear slightly dry and crumbly, which is the desired state for a short-textured biscuit. Overmixing at this stage will activate the gluten, leading to a tough, bread-like consistency rather than a tender cookie.
Step 6: Portioning and Flattening
Use a spring-loaded scoop to portion 1.5-tablespoon sized balls. Roll them briefly in your palms to smooth the surface, then place them on the sheets. Gently flatten each sphere with your palm to a thickness of 1/3-inch. This physical shaping controls the final diameter and ensures uniform heat penetration across the batch.
Step 7: The Bake and Carry-Over Cooling
Bake for 12 to 14 minutes. Look for the edges to turn a very light golden brown while the centers remains pale and set. Remove from the oven and allow the cookies to rest on the sheet for 5 minutes. This period of carry-over cooking allows the internal structure to firm up before they are moved to a wire rack to cool completely.
Step 8: Glaze Application and Setting
Whisk the sifted powdered sugar with lemon juice one tablespoon at a time. The glaze should be thick enough to hold its shape but fluid enough to level itself when spooned onto the cookie. Top each cooled biscuit with the glaze and extra zest. Allow the glaze to dehydrate and set for at least 30 minutes before storage.
Jordan’s Technique Notes and Wisdom
One of the most critical factors in this recipe is the management of the glaze viscosity. If the glaze is too thin, it will soak into the cookie, ruining the crisp surface tension we aim to achieve. A professional tip is to perform a ‘ribbon test’—when the whisk is lifted, the glaze should fall back into the bowl in a slow ribbon that holds its shape for three seconds before disappearing. This level of precision is discussed further in our Foundation Cookie Recipes. For those looking to understand the history of glaze ratios, the laboratory-tested methods at Handle the Heat provide an excellent baseline for how acid affects sugar crystallization. Remember to always sift your powdered sugar; Victorian bakers used fine linens for this, but a modern mesh sieve is perfectly sufficient to prevent unsightly lumps in your finish.
Classic Variations and Regional Adaptations
While the Lemon Glazed Cookies 2 focus on pure citrus, historical records show that variations were common across the British Isles. In Shrewsbury, a similar biscuit often included caraway seeds, which provide an earthy contrast to the bright lemon. You may also try a Welsh variation by substituting half of the lemon juice in the glaze with a high-quality elderflower syrup, which complements the citrus with floral notes. For those interested in how these techniques translate to other seasonal flavors, our Holiday Cookie Science section details how to swap citrus for warming spices like ginger and nutmeg while maintaining the structural integrity of the no-chill dough. Another tested adaptation is to bake the dough as bars in an 8×8 pan, a method that dates back to early ‘tray bakes’ used for large gatherings where individual portioning was too time-consuming.
Traditional Service and Modern Presentation
In the spirit of British hospitality, these Lemon Glazed Cookies 2 are best served alongside a pot of hot tea. A light Darjeeling or a traditional Earl Grey provides a tannic backbone that cleanses the palate between bites of the sweet, acidic glaze. For a more formal presentation, arrange the cookies on a tiered china stand, a method popularized during the Victorian era to save space on crowded tea tables. If you are looking for advice on how to pipe more intricate designs with your glaze, please visit our guide on Precision Cookie Decorating. For a modern twist, serve these cookies slightly chilled on a marble platter, which helps keep the butter-rich crumb firm and refreshing during summer months.
The Technical Truth of Citrus Bakes
Success with Lemon Glazed Cookies 2 is a matter of understanding the intersection of historical wisdom and modern chemistry. By respecting the temperature of your fats and the mechanical needs of the creaming process, you produce a cookie that is far superior to standard commercial offerings. This methodical approach is the core of our Efficient Cookie Methods, where we prove that precision leads to better bakes in less time. We would be proud to see your results; please share your bakes with us on Pinterest, Instagram, or Facebook. Mastering these classic techniques is the first step toward becoming a truly knowledgeable home baker.
