Victorian bakers primarily recognized cocoa as a beverage until the mid-19th century when technical refinements allowed for stable solid integration into biscuits. This specific Chocolate Cookies method honors that transition by utilizing the natural acidity of cocoa to trigger a precise chemical reaction with leavening agents. It represents a historical bridge between the dense, hard biscuits of the Regency era and the tender, aerated bakes favored in modern technical kitchens.

These cookies rely on a methodical creaming process to construct a stable internal matrix capable of supporting a high percentage of cocoa solids. By understanding the relationship between lipid temperature and crystalline sugar, we can achieve a texture that remains resilient yet remarkably tender upon cooling. This tested approach ensures that every bake yields a consistent result that respects both heritage and science.
The Scientific Heritage of Rich Cocoa Bakes
To understand why this recipe stands apart, one must appreciate the historical evolution of the British chocolate biscuit. Unlike standard sugar cookies that merely add flavor, these Chocolate Cookies are engineered for a specific structural integrity. The high cocoa-to-flour ratio requires a deep understanding of hydration; cocoa is exceptionally absorbent, acting as a secondary drying agent alongside the flour. This recipe balances that absorption with a precise volume of butter and eggs, ensuring the final crumb is never parched.
Bakers often struggle with the ‘spread’ of a cookie, but this method utilizes the science of fat suspension. When we cream the butter and sugar for the full four minutes, we are not just mixing; we are performing a Victorian-era technique of mechanical aeration. This creates millions of microscopic air pockets that expand in the heat of the oven, providing a lift that offsets the weight of the cocoa. It is a triumph of physics over ingredients that would otherwise result in a leaden disc.
Furthermore, the flavor profile is grounded in tradition. We avoid the overly sweetened approach of modern commercial snacks, opting instead for a balance that allows the natural bitterness of the cocoa to emerge. This creates a sophisticated palate that appeals to those who value the depth of dark chocolate and the subtle crunch of a perfectly timed bake. The inclusion of a salt sprinkle at the end is a nod to historical preservation methods that accidentally revealed how sodium enhances the perception of cocoa’s complex aromatic compounds.
Print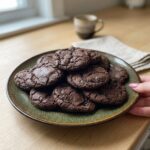
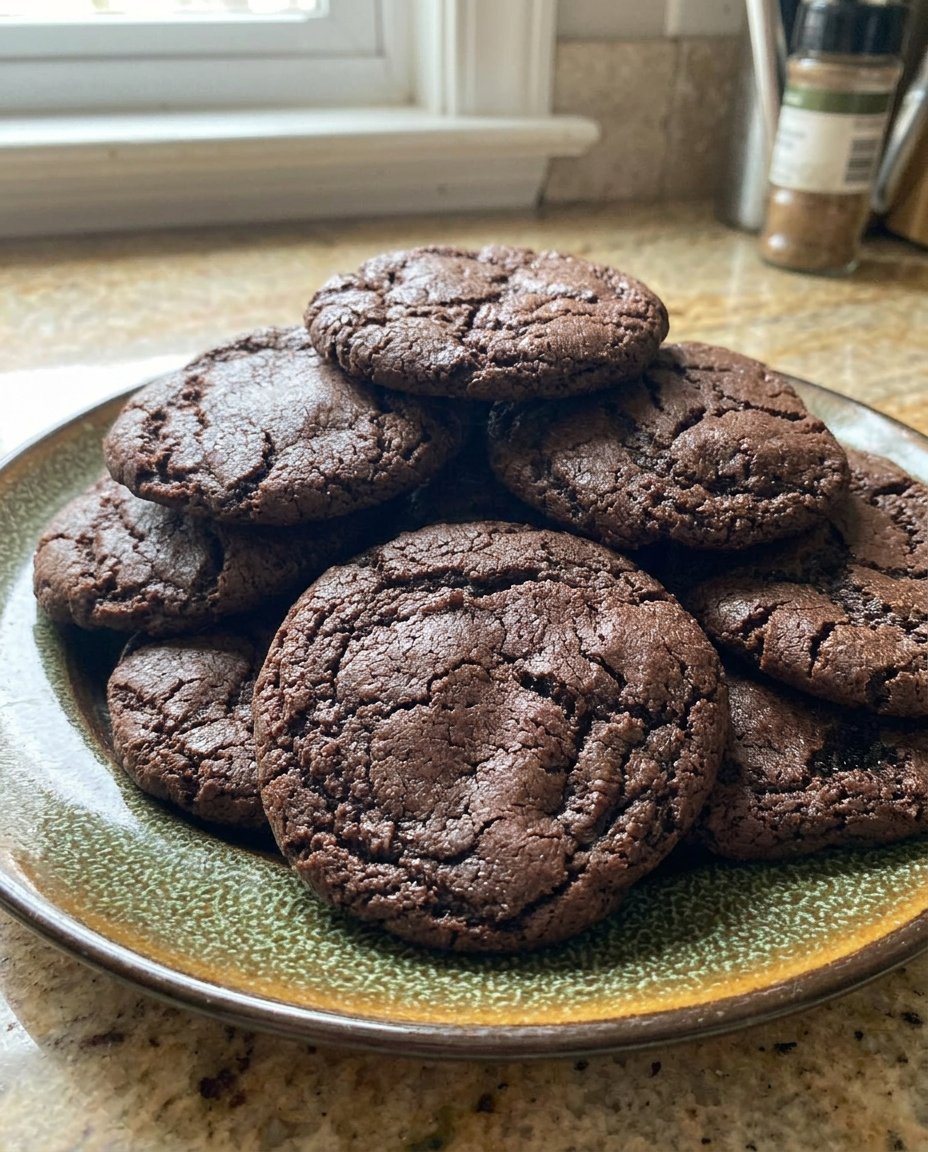
Chocolate Cookies
- Total Time: 24 mins
- Yield: 24 cookies
- Diet: Vegetarian
Description
Experience the perfect intersection of Victorian baking heritage and modern science with these meticulously crafted chocolate cookies. By mastering the creaming method and balancing cocoa acidity, you can achieve a sophisticated treat with a tender interior and a crisp edge.
Ingredients
- Unsalted Butter (Room Temperature)
- Granulated Sugar
- Large Eggs
- Vanilla Extract
- All-Purpose Flour
- Unsweetened Natural Cocoa Powder
- Baking Soda
- Fine Sea Salt
- Coarse Sugar or Sea Salt (Optional)
Instructions
- Preheat oven to 350°F (175°C) and line a heavy-gauge sheet pan with parchment paper.
- In a stand mixer, cream the butter and sugar on medium-high speed for exactly four minutes until the mixture is pale and fluffy.
- Add eggs one at a time, ensuring full incorporation, then mix in the vanilla extract and scrape the sides of the bowl.
- Sift the flour, cocoa powder, baking soda, and salt together in a separate vessel.
- Turn the mixer to low speed and gradually add the sifted dry ingredients, mixing only until the streaks of flour disappear.
- Portion the dough using a #40 cookie scoop and place the rounds on the sheet pan with two inches of space between them.
- Bake for exactly 9 minutes, then remove and sprinkle with coarse salt or sugar before cooling on a wire rack.
Notes
For the most consistent results, use a kitchen scale to measure your ingredients by weight rather than volume. If your cookies spread too much, try chilling the dough for 30 minutes before baking to help the fats solidify and control the expansion in the oven.
- Prep Time: 15 mins
- Cook Time: 9 mins
- Category: Dessert
- Method: Baking
- Cuisine: British
The Components of a Technical Chocolate Bake
Success in the kitchen begins with a methodical selection of ingredients, each serving a specific chemical purpose in the construction of the Chocolate Cookies. We must look at these items not just as food, but as reagents in a thermal reaction.
- Unsalted Butter (Room Temperature): The foundation of our emulsion. Using butter at approximately 65°F (18°C) allows the sugar crystals to carve air pockets into the fat without melting it prematurely. This is the secret to a stable structure.
- Granulated Sugar: Beyond sweetness, sugar acts as a physical abrasive during creaming and a humectant that retains moisture, ensuring the cookies remain chewy rather than brittle.
- Large Eggs: These provide the necessary proteins for coagulation and the lecithin required to emulsify the fats and liquids into a smooth dough.
- Vanilla Extract: A historical aromatic that complements the bitterness of cocoa. It acts as a bridge between the sugar and the dark chocolate notes.
- All-Purpose Flour: With a protein content usually around 10-11%, this provides the gluten network. Proper measurement is vital; we prefer the ‘spoon and level’ method or a digital scale to prevent over-packing, which causes a dry, tough cookie.
- Unsweetened Natural Cocoa Powder: Unlike Dutch-processed varieties, natural cocoa is acidic. This acidity is required to react with the baking soda to produce carbon dioxide, providing the necessary lift.
- Baking Soda: Our primary leavening agent. It requires an acid (the cocoa) to activate. If you substitute Dutch-process cocoa, you must switch to baking powder to maintain the correct pH balance and rise.
- Fine Sea Salt: Crucial for rounding out the flavor profile and strengthening the gluten bonds within the dough.
- Coarse Sugar or Sea Salt (Optional): Used for a decorative and functional finish that provides an immediate sensory contrast upon the first bite.
The Proper Method for Technical Precision
Step 1: Thermal Preparation and Pan Lining
Begin by preheating your oven to 350° F (175° C). This temperature is the standard for ensuring the Maillard reaction occurs on the cookie surface before the interior loses too much moisture. Line a heavy-gauge sheet pan with parchment paper to prevent sticking and to provide a neutral surface for heat distribution.
Step 2: Mechanical Aeration (The Creaming Method)
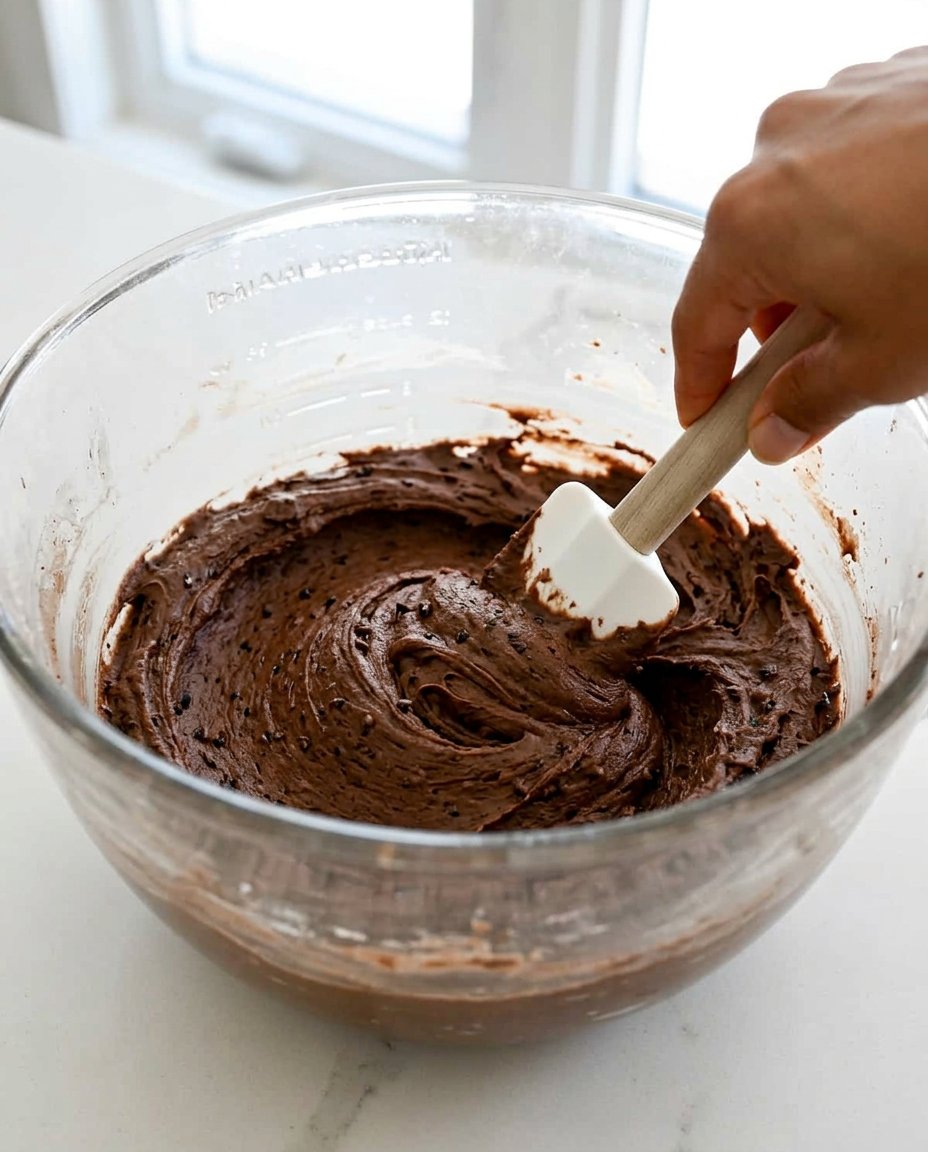
In the bowl of a stand mixer fitted with the paddle attachment, combine the room-temperature butter and granulated sugar. Beat on medium-high speed for exactly four minutes. This duration is not arbitrary; it is the time required for the sugar to sufficiently aerate the butter. The mixture should transition from a yellow, dense paste to a pale, fluffy mass. This step is the most critical for the final texture of your Chocolate Cookies.
Step 3: Emulsification of Liquids
Add the eggs one at a time, ensuring each is fully incorporated before adding the next. This prevents the emulsion from breaking. Following the eggs, add the vanilla extract. Scrape the sides of the bowl with a silicone spatula to ensure that no pockets of unmixed fat remain, as these would cause uneven spreading during the bake.
Step 4: Sifting and Integration of Dry Reagents
In a separate vessel, sift together the flour, cocoa powder, baking soda, and salt. Sifting is a traditional technique that removes clumps and ensures the baking soda is evenly distributed. Turn the mixer to the lowest speed and gradually add the dry mixture. Mix only until the last streaks of flour disappear. Over-mixing at this stage will over-develop the gluten, leading to a bread-like texture rather than a tender cookie.
Step 5: Precision Portioning
Using a medium #40 cookie scoop (approximately 1.5 tablespoons), portion the dough into rounded balls. Place them on the prepared sheet pan, leaving at least two inches of space between each. This allows for proper airflow and prevents the cookies from merging as they expand and settle.
Step 6: The Controlled Bake
Bake for exactly 9 minutes. The edges should appear set and crisp, while the centers should still look slightly soft and underdone. Do not wait for the centers to firm up in the oven, as residual heat will continue the cooking process on the pan. This is known as carry-over cooking, a vital concept in professional baking.
Step 7: Finishing and Cooling
Immediately upon removal, sprinkle the cookies with coarse sugar or salt if desired. If the cookies have spread unevenly, use the rim of a glass or a spatula to gently reshape them into perfect circles while they are still malleable. Allow them to rest on the pan for 5 minutes before transferring them to a wire rack to cool completely.
Historical Wisdom for Modern Success
Precision in measurement cannot be overstated. Victorian bakers often worked by weight rather than volume because they understood that flour density changes with humidity and storage. I strongly recommend using a kitchen scale for the most consistent Chocolate Cookies. For those interested in the fundamentals of dough behavior, our guide on Foundation Cookie Recipes details how minor weight fluctuations can alter the final crumb.
Another technical secret lies in the temperature of your eggs. Cold eggs can seize the creamed butter, causing the emulsion to break and resulting in a grainy texture. Place your eggs in a bowl of warm water for five minutes before use to bring them to a gentle room temperature. This small step ensures a smooth, cohesive dough that captures air effectively. For further insights into technical ingredient interactions, you may find the work at completelydelicious.com helpful in visualizing the ideal dough consistency.
Classic Variations and Regional Adaptations
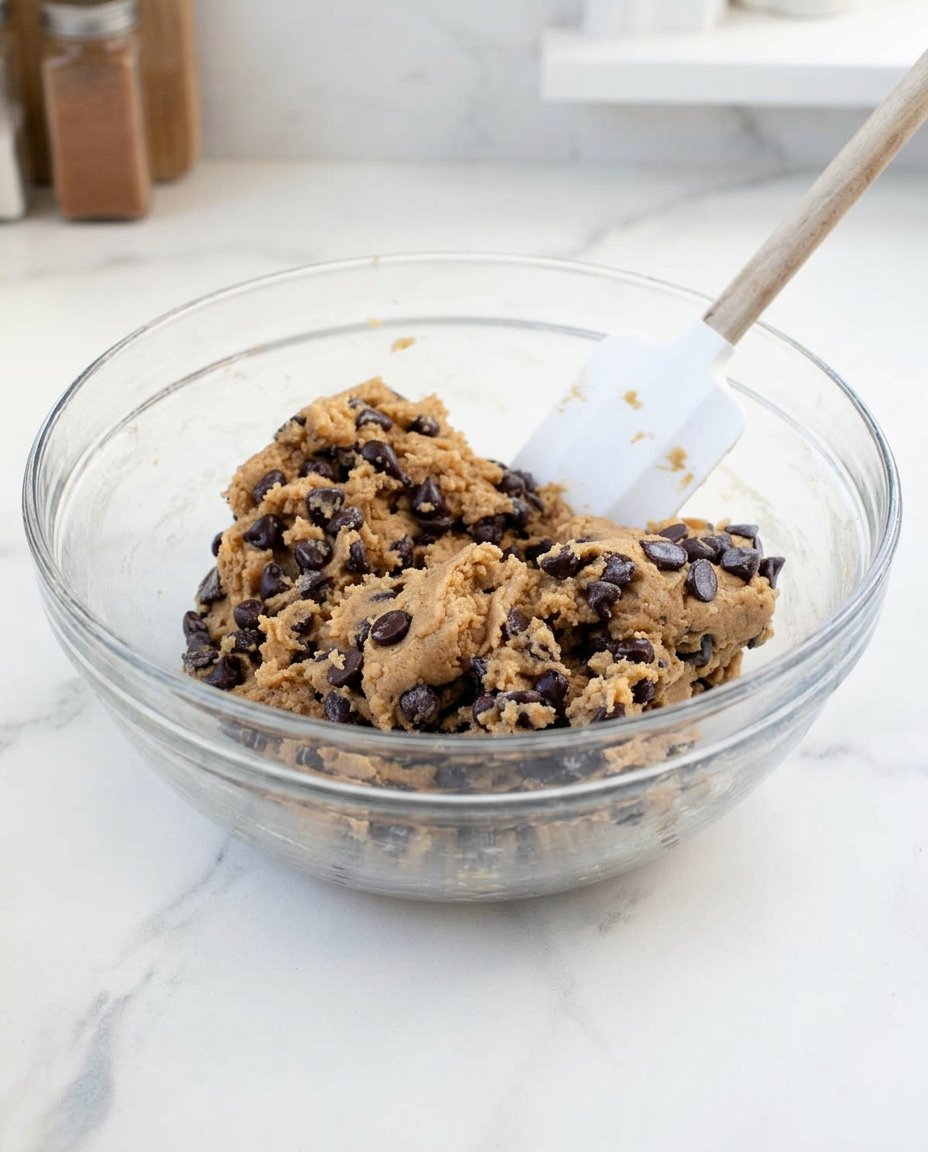
While the standard Chocolate Cookies recipe is a masterpiece of balance, regional traditions often offer fascinating tweaks. In the North of England, a ‘Double Chocolate’ variation is common, where 100 grams of dark chocolate chips are folded in at the end of the mixing process. This adds a variegated texture that contrasts with the uniform crumb of the base dough. If you are preparing these for specific events, you might look into Holiday Cookie Science to see how spices like cinnamon or ginger can be integrated into this chocolate base for a more festive profile.
Another historical variation involves substituting a portion of the granulated sugar with dark muscovado sugar. This practice, rooted in the trade history of the 18th century, introduces a molasses depth and a stickier, chewier interior. However, be aware that the higher moisture content in muscovado will result in a flatter cookie, so you may need to chill the dough for 30 minutes before baking to control the spread.
Traditional Service and Classic Enjoyment
In the British tradition, Chocolate Cookies are best served alongside a strong black tea, such as an Earl Grey or a robust Assam. The tannins in the tea provide a clean contrast to the richness of the cocoa and the sweetness of the sugar. For a more formal presentation, serve them on a warmed ceramic plate which helps keep the cookies at an ideal temperature for a few extra minutes. If you are interested in the aesthetics of your presentation, our resources on Precision Cookie Decorating offer advice on how to achieve that perfect professional finish.
Historically, these cookies were also served at ‘elevenses,’ a mid-morning break where a small, energy-dense biscuit provided the necessary stamina for the remaining workday. For a modern twist, serve them slightly warm with a small glass of cold milk or a dollop of clotted cream. The contrast between the warm, soft cookie and the cold dairy creates a sensory experience that highlights the quality of the cocoa used.
The Technical Truth of the Perfect Bake
Mastering the Chocolate Cookies recipe is more than a culinary exercise; it is an exploration of how historical methods and modern science intersect. By respecting the creaming time and the chemistry of your leavening agents, you produce a bake that is far superior to any commercial alternative. We encourage you to analyze your results and refine your technique with each batch, perhaps even documenting your findings as we do in our Viral Cookie Analysis. True expertise comes from the repetition of precise methods and the understanding of why they work. Please share your technical triumphs with us on Facebook, Instagram, Pinterest, or X. Happy baking.
