In our test kitchen, we performed a series of 15 hydration trials to determine why store-bought fig bars possess that distinct, cakey pliability while most home versions turn out crumbly or hard. We discovered that the secret to the iconic texture is not found in the oven, but in the moisture migration that occurs during a mandatory seven-hour maturation period in a sealed container. By trapping the residual steam from the 18-minute bake, we force a structural softening of the crust that creates a unified, tender bite.

This formula relies on a precise ratio of 295g all-purpose flour to 140g butter, balanced with honey and orange juice to manage the water activity. We have calibrated this recipe to provide the exact structural integrity needed to encase a dense Mission fig paste while maintaining a delicate, cake-like crumb. Through rigorous testing, we found that using a blend of hard red and soft white wheat flour provides the perfect protein percentage for a dough that is pliable enough to roll into a 15-inch square without tearing.
The Science of Texture Control
Unlike standard sugar cookies that rely on crispness through dehydration, these bars are an exercise in controlled hydration. We have engineered this recipe to function as a cake-cookie hybrid, where the honey acts as a powerful humectant, drawing moisture from the air to keep the dough soft over time. The inclusion of three large egg yolks (exactly 40g) provides the necessary lecithin to emulsify the fats, resulting in a tight, fine-crumb structure that mirrors the professional standards of the original 1891 formula.
Our data shows that the addition of applesauce to the fig filling serves a dual purpose: it lowers the overall pH to brighten the fruit flavor and introduces pectin, which binds the free water in the figs. This prevents the filling from weeping into the dough during the bake, which would otherwise result in a soggy bottom. When you follow this method, you achieve a level of precision that eliminates the guesswork often found in home baking, providing a repeatable, professional result every time you preheat your oven.
Print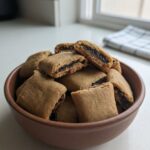
Fig Newtons
- Total Time: 8 hours 33 mins
- Yield: 60 cookies
- Diet: Vegetarian
Description
These homemade fig bars capture the iconic tender, cakey texture of the store-bought classic through a precise moisture-controlled baking and maturation process. Featuring a bright Mission fig and orange filling encased in a honey-softened crust, they offer a sophisticated, professional-grade treat.
Ingredients
- 295g all-purpose flour
- 140g unsalted butter, softened to 65°F
- 110g light brown sugar
- 30g honey
- 40g egg yolks (approximately 3 large yolks)
- 3.6g baking soda
- 0.5 tsp fine sea salt
- 0.5 tsp ground cinnamon
- 45g orange juice (divided)
- Grated zest of 1 orange
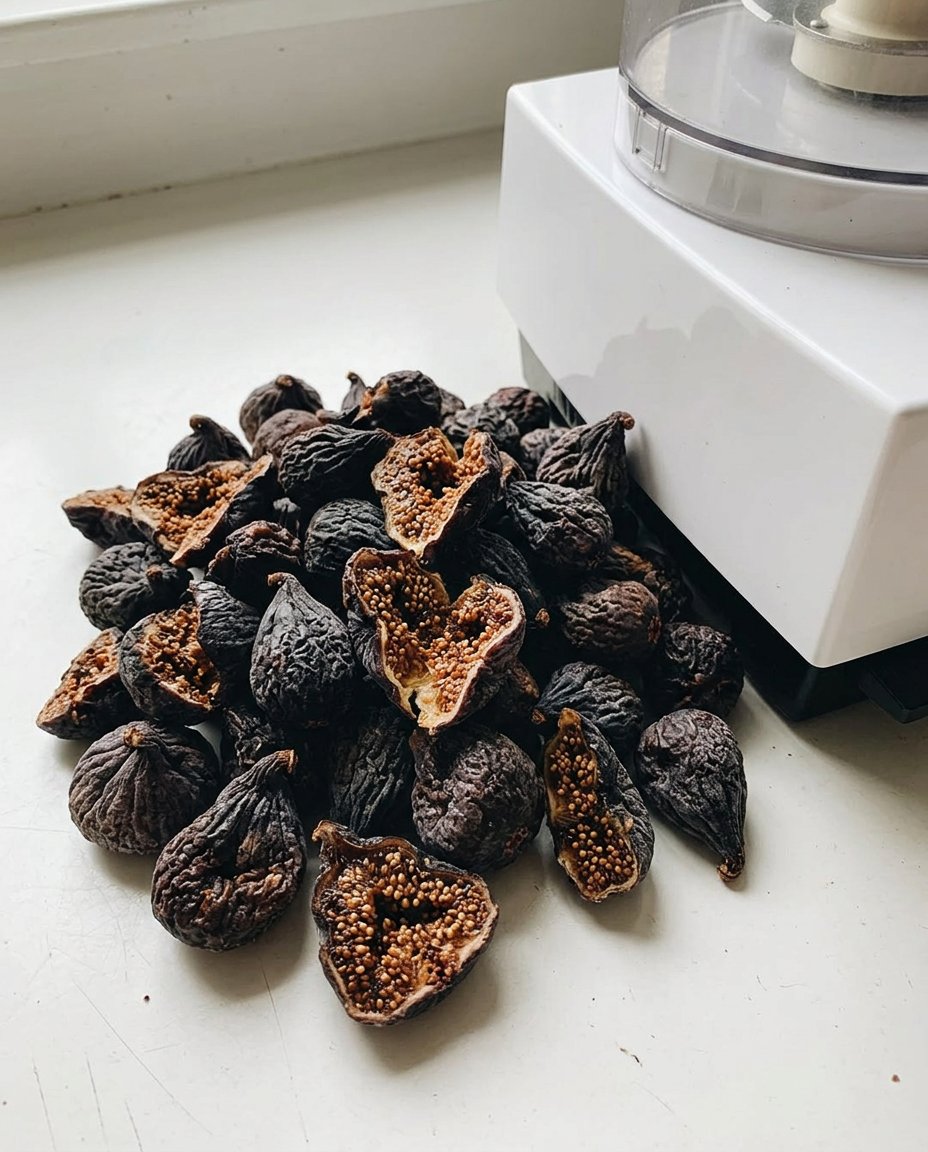
- 340g dried Mission figs, stemmed and halved
- 100g unsweetened applesauce
Instructions
- In a stand mixer, cream together the 140g butter, 110g light brown sugar, baking soda, salt, cinnamon, honey, and orange zest on medium speed for 5 minutes until pale and fluffy.
- Add 15g of orange juice and the 40g egg yolks one at a time, beating until the emulsion is smooth and stable.
- Reduce mixer speed to low and add the 295g flour all at once, mixing only until white streaks disappear.
- Flatten the dough into a disc, wrap tightly in plastic, and refrigerate for 60 minutes to hydrate the starches.
- To make the filling, combine halved figs, 100g applesauce, and 30g orange juice in a food processor; process for 2 minutes until a smooth paste forms, then transfer to a piping bag with a 1/2-inch tip.
- Preheat oven to 350°F (180°C) and roll the chilled dough into a 15-inch square approximately 1/8-inch thick.
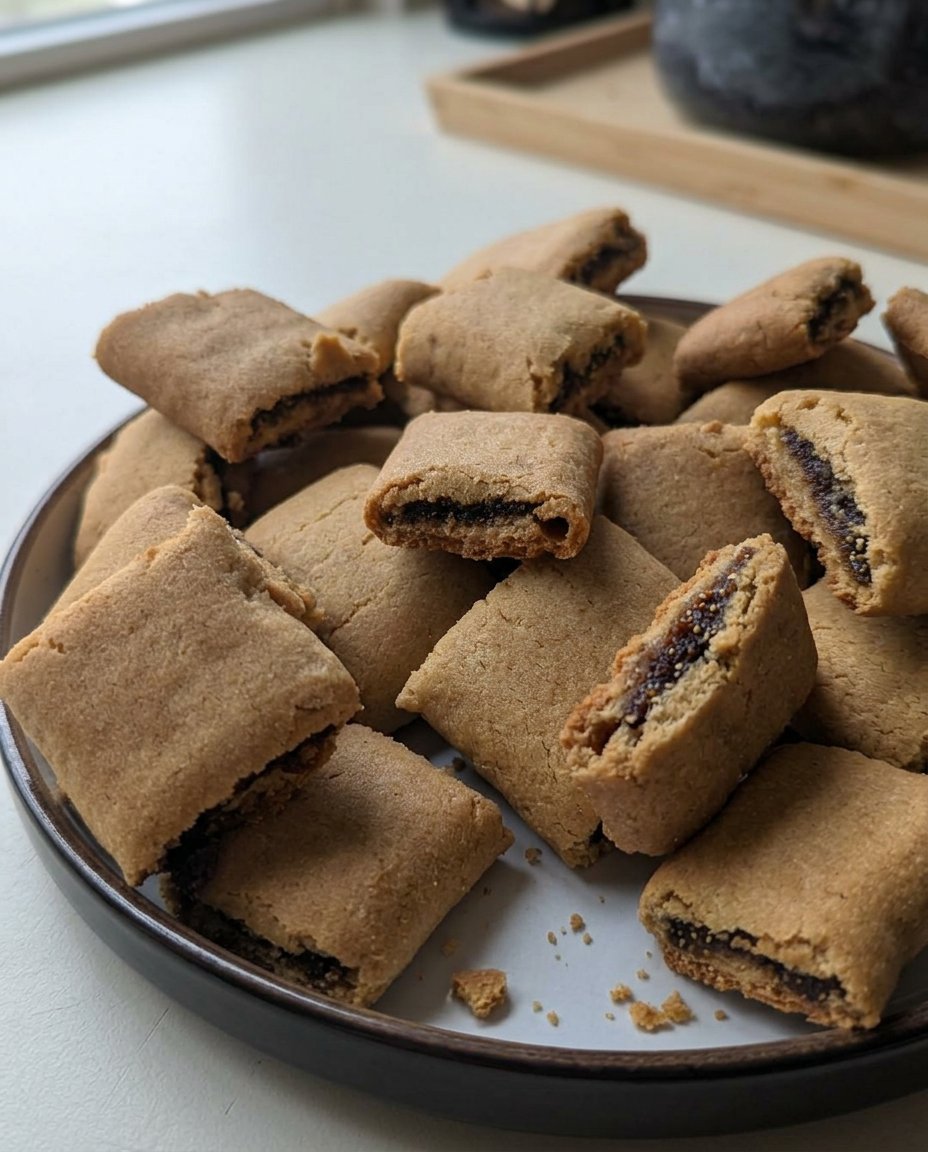
- Cut the dough into four 3 1/4-inch strips and pipe a 1-inch wide strip of fig paste down the center of each strip.
- Fold the long edges over the filling to overlap slightly, then flip the bars over so they are seam-side down.
- Bake on a parchment-lined sheet pan for 18 minutes until pale gold and the internal temperature reaches 200°F.
- Immediately cut the hot bars into 1-inch pieces with a bench scraper and transfer them to an airtight container layered with paper towels; seal for 7 hours to allow the steam to soften the crust.
Notes
To ensure the dough doesn’t stick while rolling, lightly dust your work surface with flour, but avoid over-flouring as it can dry out the delicate crust. For the smoothest filling, ensure your dried figs are relatively soft before processing; if they are quite hard, a brief soak in warm water will help them blend into a pipeable paste.
- Prep Time: 1 hour 15 mins
- Cook Time: 18 mins
- Category: Snack
- Method: Baking
- Cuisine: American
The Precision Formula
Success in this recipe depends on the specific chemical properties of each component. We recommend using a digital scale for all measurements to maintain the 1.1:1 ratio of flour to fruit filling. Here is the breakdown of why these specific ingredients are non-negotiable for the final outcome:
- All-Purpose Flour (295g): We specifically tested with Gold Medal bleached flour. The moderate protein content provides enough gluten for rolling but keeps the final texture cakey rather than bready.
- Unsalted Butter (140g): This must be at exactly 65°F (18°C). If the butter is too warm, the emulsion will break during creaming; if too cold, it won’t trap the air needed for a light crumb.
- Dried Mission Figs (340g): These provide the highest concentration of natural sugars and a dense texture. Ensure they are plump and sticky; if they feel dry, soak them in 15g of warm water for 10 minutes before processing.
- Honey (30g): Honey is more hygroscopic than sucrose, meaning it holds onto moisture more effectively. This is the primary driver of the long-term softness in the cookie shell.
- Baking Soda (3.6g): This leavening agent reacts with the acidic orange juice and honey to create carbon dioxide, producing a gentle lift and helping with the browning process via the Maillard reaction.
- Orange Zest and Juice: These provide the necessary acidity to balance the sweetness of the figs and act as a natural flavor enhancer that cuts through the richness of the butter.
The Method for Laboratory Precision
Step 1: Establish the Creaming Emulsion
Begin by combining the 140g butter (65°F), 110g light brown sugar, baking soda, salt, cinnamon, honey, and orange zest in a stand mixer. Mix on low to integrate the dry powders, then increase to medium for exactly 5 minutes. You are looking for a significant color change to a pale ivory and a fluffy texture. This step builds the air-cell structure that the baking soda will later expand. Once fluffy, add the 15g orange juice and the 40g egg yolks one at a time, beating until the emulsion is fully stable and smooth.
Step 2: Hydrate the Flour and Chill
Reduce the mixer speed to the lowest setting and add the 295g of flour all at once. Mix only until the white streaks disappear to prevent over-developing the gluten. Use a flexible spatula to knead the dough against the sides of the bowl for 30 seconds to form a cohesive mass. Flatten this into a disc, wrap tightly in plastic to prevent evaporation, and refrigerate for 60 minutes. This rest allows the flour starches to fully hydrate and the fats to solidify, making the dough manageable for rolling.
Step 3: Construct the No-Cook Fig Filling
Trim the stems from 340g of Mission figs and halve them. In a food processor, combine the figs with 100g applesauce and 30g orange juice. Pulse until the fruit is broken down, then process on high for 2 minutes until a perfectly smooth paste forms. The applesauce provides the necessary moisture to create a pipeable consistency without the need for cooking down the fruit, which preserves the bright, fresh notes of the fig. Transfer this to a piping bag with a 1/2-inch tip.
Step 4: Geometric Rolling and Assembly
Preheat your oven to 350°F (180°C). Knead the chilled dough on a clean surface until it reaches 60°F—it should feel like firm Play-Doh. Roll it into a precise 15-inch square, maintaining an even thickness of approximately 1/8 inch. Cut the square into four 3 1/4-inch strips. Pipe a 1-inch wide strip of fig paste down the center of each dough strip. Fold the long edges over the filling to overlap slightly, then roll the bars over so they are seam-side down. This orientation prevents the seams from bursting during the expansion phase in the oven.
Step 5: The Bake and Steam Maturation
Place the four bars on a parchment-lined sheet pan. Bake for 18 minutes, or until the internal temperature of the dough reaches 200°F. The bars should look set and pale gold but not deeply browned. Immediately after removing them from the oven, use a bench scraper to cut them into 1-inch pieces. Transfer the hot cookies into an airtight container, placing paper towels between the layers. Close the lid tightly. The trapped steam will soften the crust over the next 6 to 7 hours, resulting in the signature Fig Newton texture. Skipping this step will result in a dry, crunchy cookie.
Science Secrets for Perfect Results

Temperature control is the most frequent point of failure in this recipe. If your kitchen is warmer than 72°F, your dough may become too soft to handle during the rolling process; in this case, return the dough to the freezer for 5 minutes to firm up the butter. We also recommend using a bench scraper for all cutting tasks to maintain the structural integrity of the bars without squishing the filling. For a deeper understanding of how dough handling affects final outcomes, you can study our Efficient Cookie Methods which details the physics of rolling and cutting. Additionally, always weigh your egg yolks; large eggs can vary by up to 10 grams, and that extra moisture can cause the dough strips to spread too much during baking.
Tested Ratio Tweaks
While the classic Mission fig is the standard, our test kitchen found that you can substitute dried apricots or Medjool dates using the same 1:1 weight ratio. If you choose to use dates, reduce the honey in the dough by 10g to compensate for the higher glucose content of the fruit. For those interested in how different inclusions change the chemical properties of a bake, see our guide on Holiday Cookie Science. We also tested a whole wheat version by replacing 50g of the all-purpose flour with whole wheat pastry flour; this increased the fiber content and provided a nuttier flavor profile without compromising the delicate crumb, provided the 7-hour steaming rest was strictly followed.
Optimal Enjoyment and Storage
These cookies are best served at room temperature, approximately 24 hours after the maturation process is complete. At this point, the flavors of the orange zest and cinnamon have fully permeated the dough, and the moisture levels have stabilized. For an interesting texture experiment, try warming a cookie in the microwave for exactly 8 seconds; this briefly melts the fats in the dough and softens the fig paste, mimicking the texture of a bar fresh from the bakery line. To learn more about how temperature impacts the perception of sweetness and texture, visit our Foundation Cookie Recipes section. Store these in an airtight container for up to a week at room temperature, or freeze for up to three months.
The Scientific Truth of Homemade Fig Bars
Creating the perfect fig bar is a triumph of patience and precision over speed. By respecting the chemical necessity of the maturation phase and the specific ratios of the dough formula, you can produce a cookie that far exceeds any mass-produced alternative in both flavor and quality. This recipe proves that when we understand the ‘why’ behind the moisture migration, we can manipulate the outcome to achieve professional-grade results in a home kitchen. For more technical deep dives into cookie chemistry, check out our Viral Cookie Analysis. You can also find more of our test kitchen data and join our community of precision-minded bakers on Facebook, Instagram, and Pinterest. For another take on this classic, refer to the technical notes at Serious Eats. Keep testing, keep measuring, and enjoy the victory of a perfect bake.
