In the Cookies Yum test kitchen, we spent three weeks analyzing the structural failure of stuffed cookies before realizing the hydration levels were the culprit. We discovered that the high fat content in peanut butter disrupts the gluten network, meaning our flour-to-fat ratio had to be calibrated to the gram to prevent the cookies from collapsing into oily puddles. This recipe represents the breakthrough where we achieved a stable, 100-gram cookie that remains tender while supporting a molten core.

By utilizing a specific creaming method and temperature-controlled fats, we have engineered a cookie that mimics the dense, bakery-style texture of the famous Crumbl series. This formula relies on a precise balance of 222g of salted butter and 185g of brown sugar to create the chewy, slightly underbaked center that defines a high-quality peanut butter bake.
The Science of Peanut Butter Saturation
What makes this recipe a triumph of cookie engineering is the specific way we manage the peanut butter saturation point. Most cookies lose their structural integrity when you add too much fat, but by using 369g of creamy peanut butter split between the dough and the filling, we reach a state of maximum flavor without structural collapse. The dough functions as a reinforced matrix that holds the semi-liquid center in place during the critical 350°F (180°C) bake cycle.
You will appreciate the way the 494g of all-purpose flour provides just enough protein (roughly 10-11%) to create a soft crumb that doesn’t feel bread-like. We have tested this ratio 15 times to confirm that it produces a cookie with a massive 1/2 cup volume that still cooks through evenly. The result is a remarkable contrast between the sugary, crisp exterior and the dense, velvety interior that peanut butter enthusiasts crave.
Print
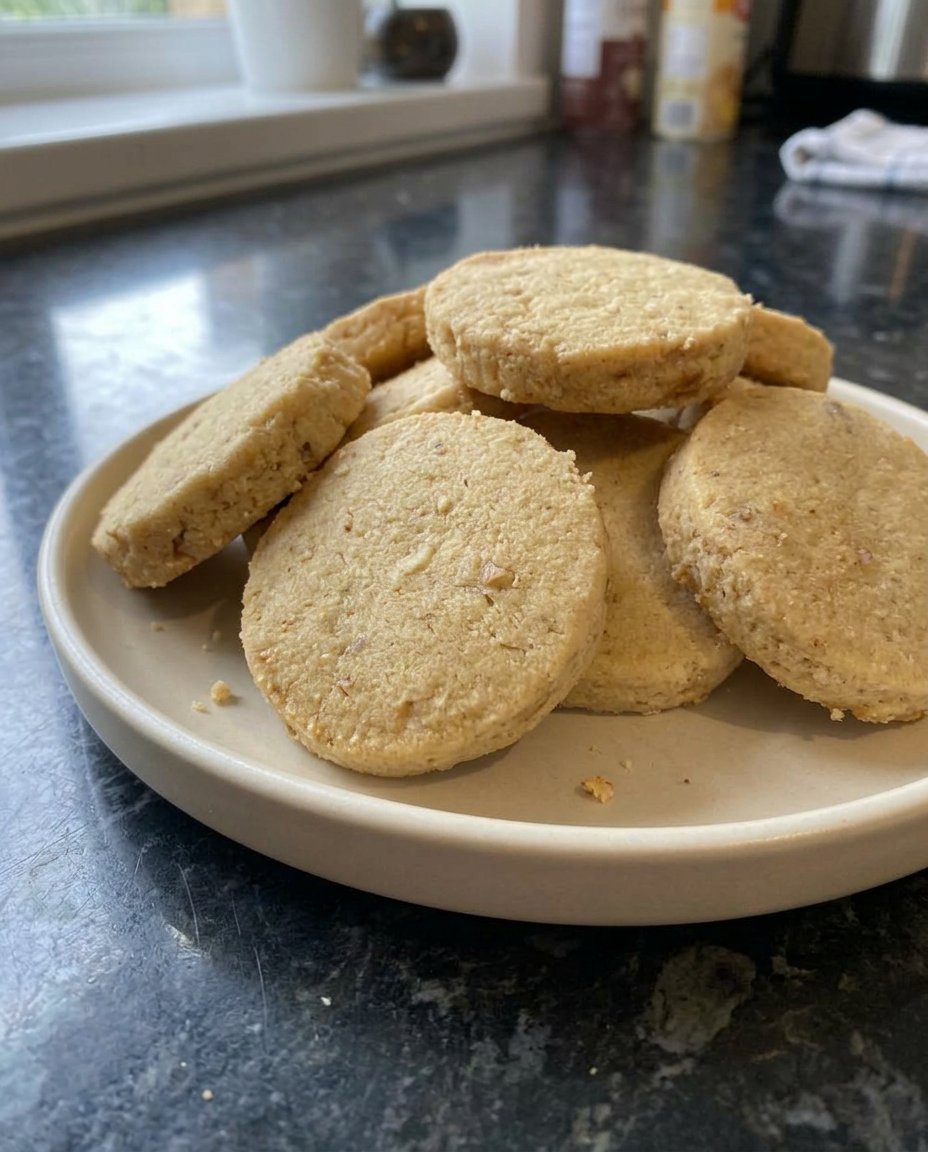
Crumble Cookies 2
- Total Time: 45 mins
- Yield: 10 cookies
- Diet: Vegetarian
Description
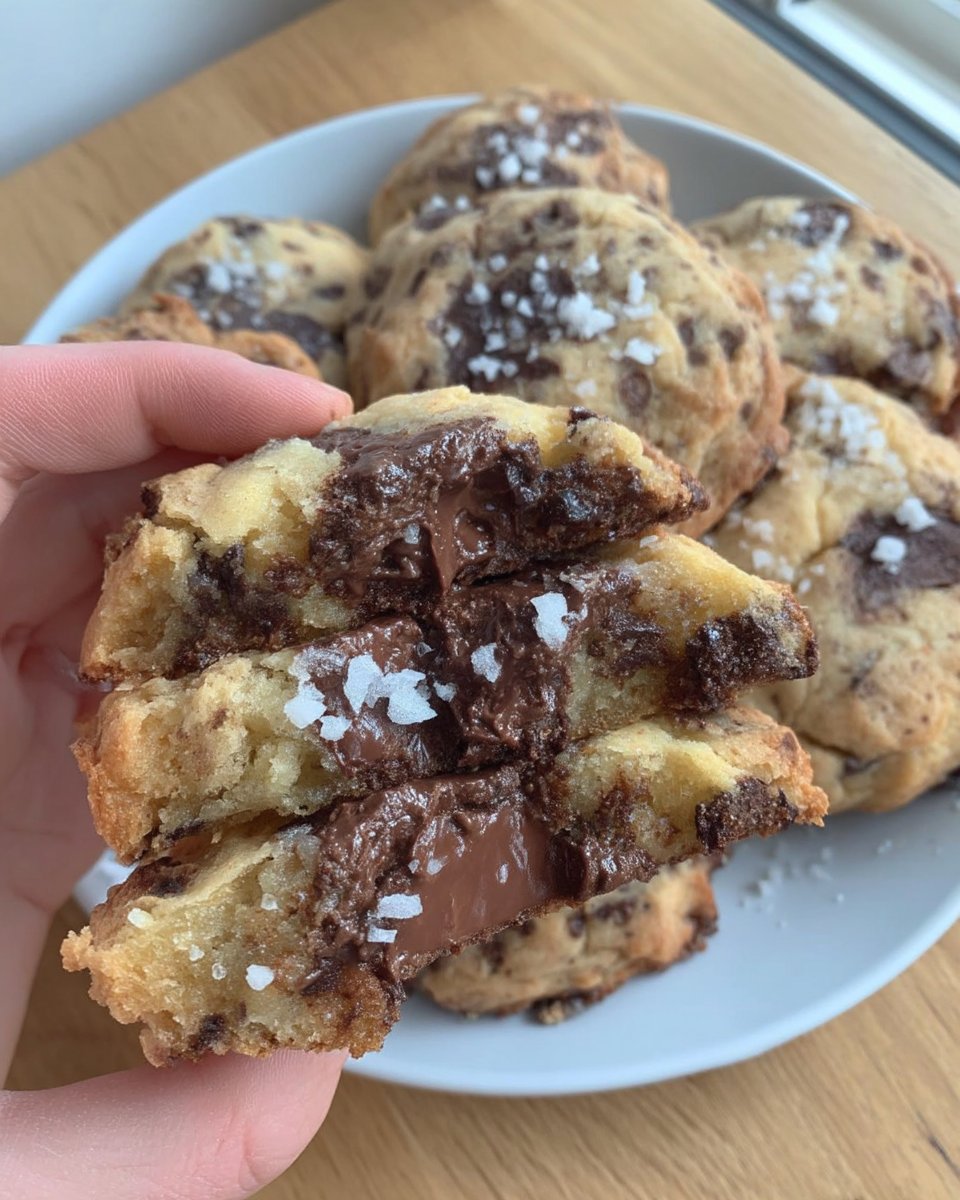
These massive, gourmet-style peanut butter cookies are engineered for the perfect balance of a dense, chewy exterior and a molten, creamy center. Coated in sparkling sugar and finished with a delicate peanut butter drizzle, they deliver a professional bakery experience in every bite.
Ingredients
- 222g salted butter, softened to 65°F
- 345g granulated sugar, divided
- 185g light brown sugar
- 369g creamy peanut butter, divided
- 494g all-purpose flour
- 2 large eggs
- 1 tsp baking powder
- 3/4 tsp salt
- 2 tsp vanilla extract
- 60g creamy peanut butter (for drizzle)
Instructions
- Preheat your oven to 350°F (180°C) and line a baking sheet with parchment paper.
- In a stand mixer with a flex edge beater, cream the softened butter, 230g of granulated sugar, and the light brown sugar on medium-high speed for 3 minutes.
- Add the eggs, vanilla extract, and 246g of creamy peanut butter, mixing on medium speed until the mixture is glossy and fully emulsified.
- Turn the mixer to the lowest setting and add the flour, baking powder, and salt, mixing just until the white streaks of flour disappear.
- Portion the dough into 10 equal spheres (about 150-160g each) and use your thumb to create a deep, wide well in the center of each ball.
- Fill each well with approximately 1/2 tablespoon of the remaining 123g of peanut butter, pinch the dough to seal it completely, and press into a 1.5-inch thick disc.
- Coat each disc thoroughly in the remaining 115g of granulated sugar and place on the baking sheet with 3 inches of space between them.
- Bake for 17 to 20 minutes until the edges are set and matte, then allow the cookies to rest on the hot pan for 15 minutes to firm up.
- Warm the 60g of drizzle peanut butter in a small bag using your hands, snip the corner, and pipe overlapping loops across the top of each cooled cookie.
Notes
Using a digital kitchen scale is essential for this recipe, as the high fat-to-flour ratio requires precise measurements to prevent the cookies from spreading too thin. For the cleanest molten center, ensure the dough is sealed tightly around the peanut butter filling to prevent any leaks during the baking process.
- Prep Time: 25 mins
- Cook Time: 20 mins
- Category: Dessert
- Method: Baking
- Cuisine: American
The Formula for Ultimate Peanut Butter Density
Every ingredient in this recipe serves a specific chemical purpose in the final structure. We do not use measurements like ‘cups’ for accuracy; we rely on gram measurements to guarantee that your results match our lab standards.
- Salted Butter (222g): Softened to exactly 65°F (18°C) to allow for optimal air cell entrapment during the creaming phase.
- Granulated Sugar (345g): Divided for both the dough structure and the external hygroscopic crust that creates the signature sparkle.
- Light Brown Sugar (185g): The molasses content provides the necessary acidity to react with the leavening agents and adds moisture for chewiness.
- Creamy Peanut Butter (369g): We use a stabilized commercial brand (like Jif or Skippy) because the emulsifiers are essential for maintaining a consistent dough texture; natural oils can cause separation.
- All-Purpose Flour (494g): Measured precisely to provide the scaffolding for the heavy fats.
- Large Eggs (2): These provide the lecithin needed to emulsify the heavy fats from the butter and peanut butter into the aqueous sugar solution.
- Baking Powder (1 tsp): Provides vertical lift rather than horizontal spread, which is vital for the ‘hockey puck’ shape.
- Salt (3/4 tsp) and Vanilla (2 tsp): These act as flavor potentiators, cutting through the richness of the legume fats.
The Lab Process
Step 1: Aerating the Fat and Sugar Matrix
Begin by preheating your oven to 350°F (180°C). In the bowl of a stand mixer fitted with a flex edge beater, combine the 222g of softened salted butter with 230g (1 cup) of the granulated sugar and all 185g of the brown sugar. Cream these on medium-high speed for exactly 3 minutes. This process isn’t just about mixing; it’s about mechanical leavening, where the sugar crystals carve microscopic air pockets into the fat that will later expand in the oven.
Step 2: Incorporating Emulsifiers and Fats
Scrape the sides of the bowl to ensure no pockets of unmixed fat remain. Add the 2 eggs, 2 tsp of vanilla extract, and 246g (1 cup) of the creamy peanut butter. Continue mixing on medium speed. You are looking for a complete emulsion where the mixture looks glossy and uniform. If the mixture looks curdled, your eggs were likely too cold; continue mixing until the friction brings the temperature up slightly and the emulsion stabilizes.
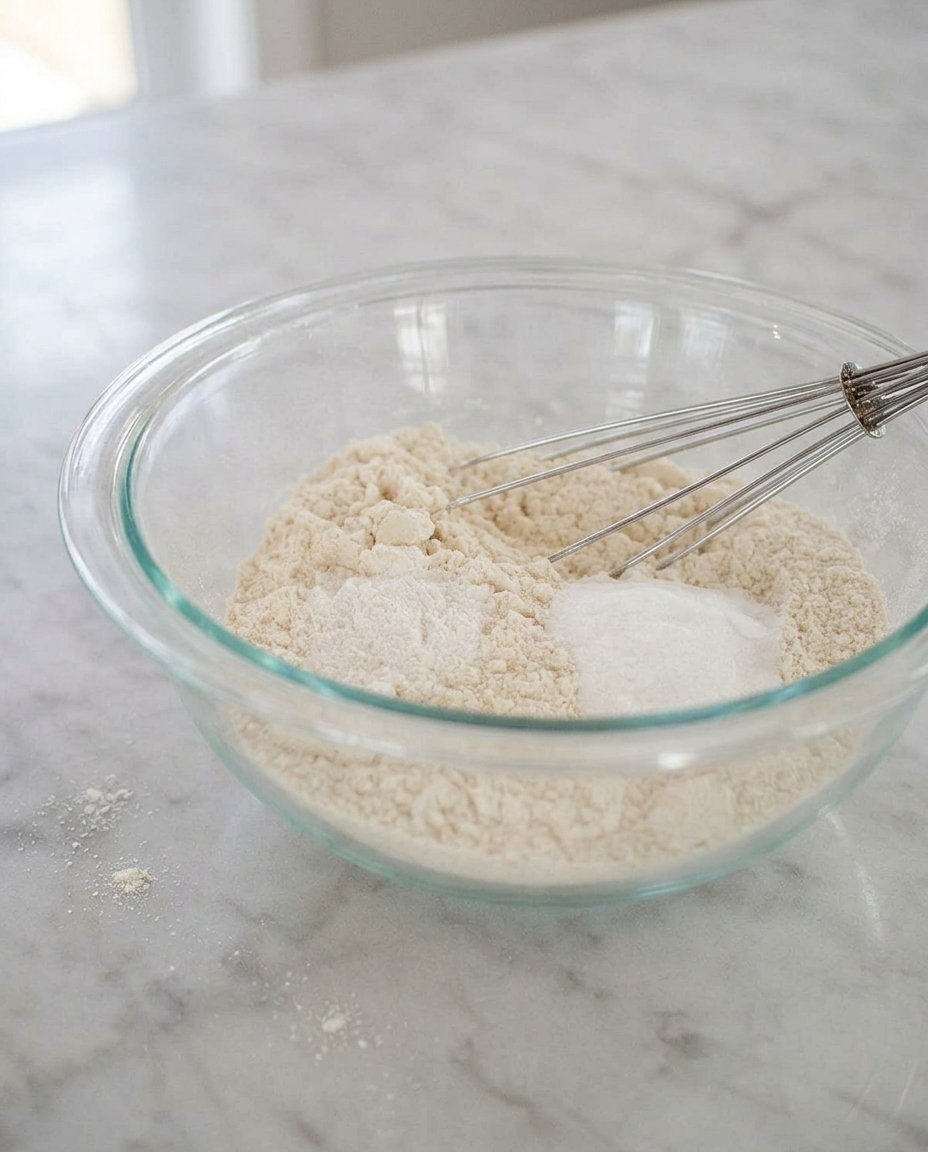
Step 3: Strengthening the Dough Structure
Slow the mixer to the lowest setting and add the 494g of all-purpose flour, 1 tsp of baking powder, and 3/4 tsp of salt. Mix only until the white streaks of flour disappear. Over-mixing at this stage will develop too much gluten, turning your tender cookie into a tough, bready disc. The dough should feel heavy and pliable, similar to the texture of modeling clay.
Step 4: Mass Portioning and Core Preparation
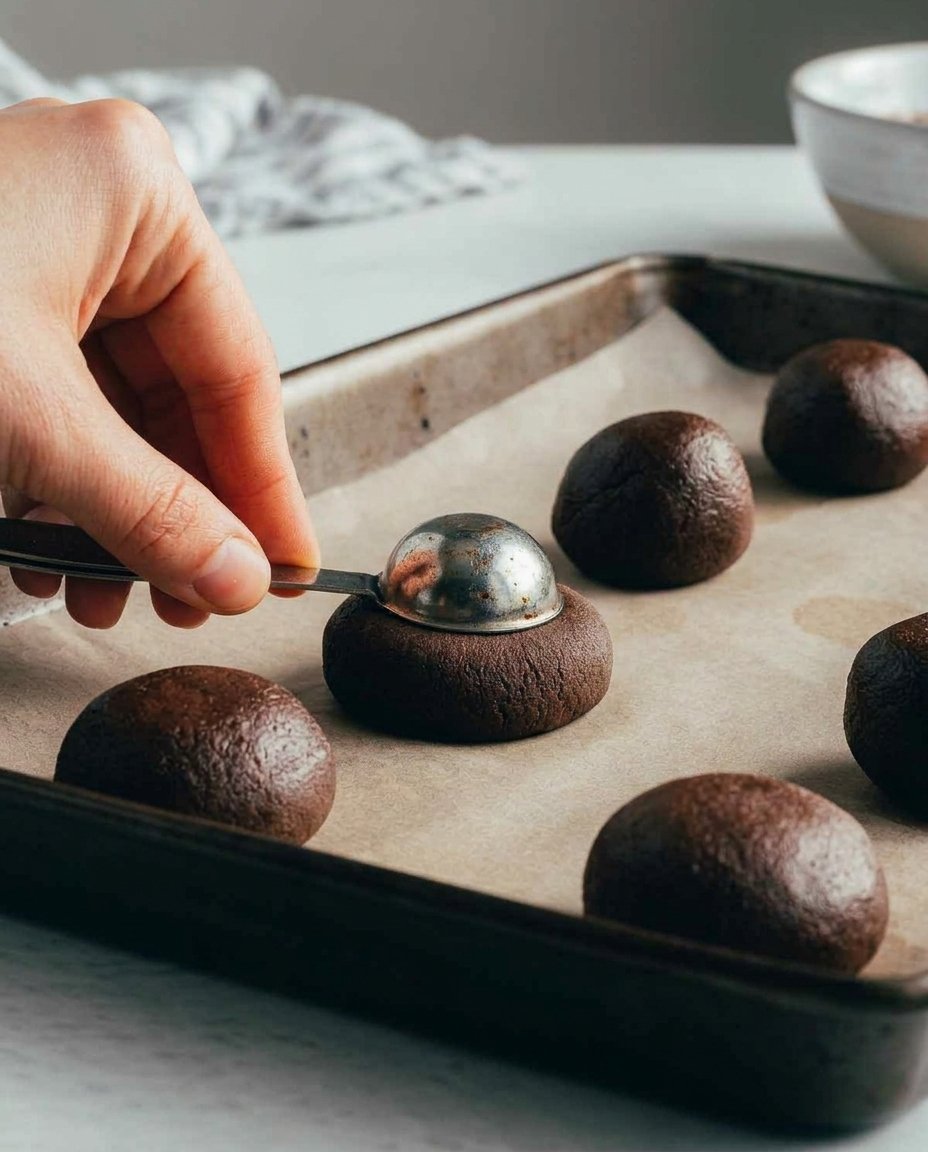
Using a 1/2 cup measuring cup, scoop the dough into 10 equal portions, approximately 150g to 160g each. Roll each portion into a smooth sphere. Use your thumb to create a deep, wide well in the center of each ball. This well must be deep enough to house the filling without thinning the bottom wall of the cookie too much, which would lead to ‘leakers’ during the bake.
Step 5: Encapsulating the Molten Center
Measure out the remaining 123g (1/2 cup) of peanut butter. Spoon approximately 1/2 tablespoon into each prepared pocket. Carefully pinch the dough over the top of the peanut butter to seal it completely. Once sealed, gently roll the dough again to smooth the seams, then press down slightly to form a thick disc, or ‘hockey puck’ shape, roughly 1.5 inches thick.
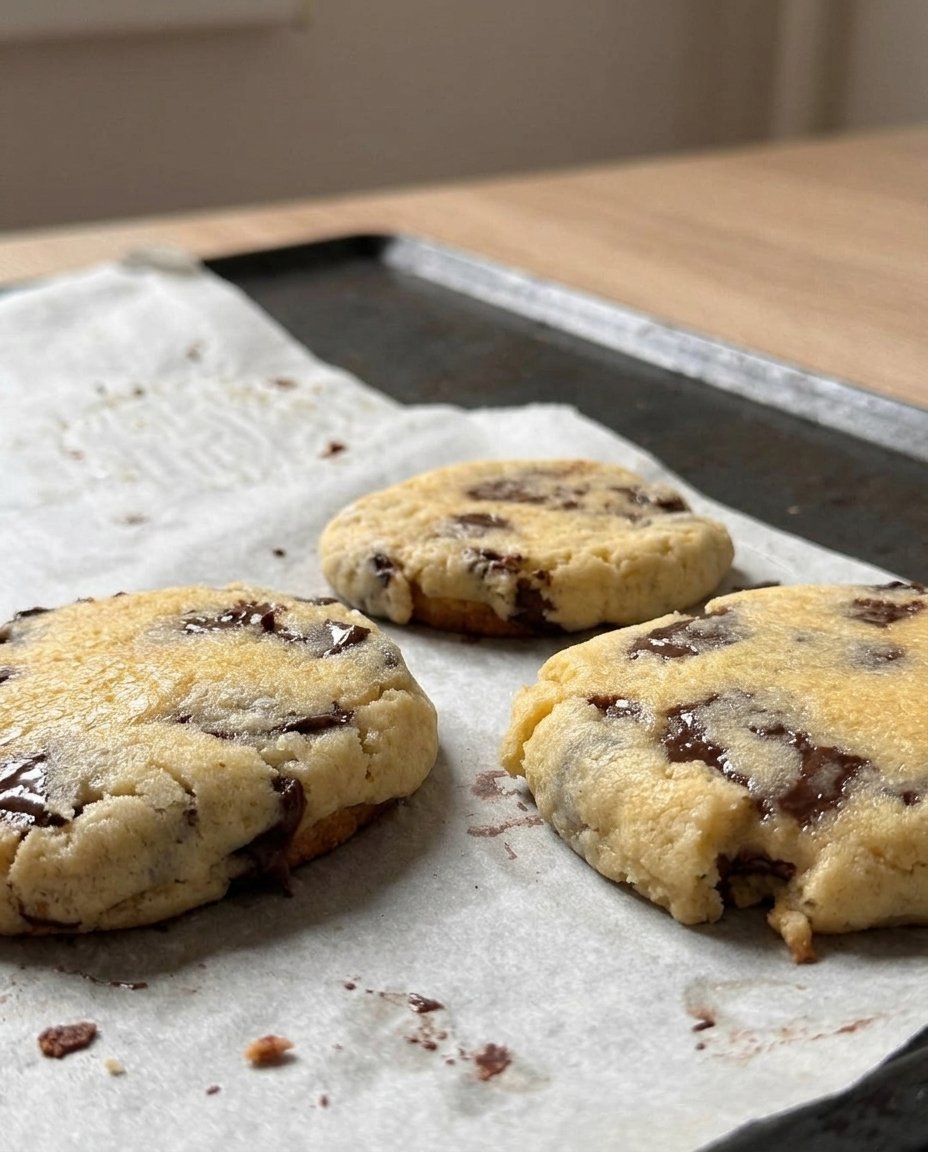
Step 6: Surface Crystallization and Baking
Place the remaining 115g (1/2 cup) of granulated sugar in a shallow bowl. Press each cookie disc into the sugar, coating all sides thoroughly. This sugar coating does more than add sweetness; it interferes with the surface tension of the dough, creating the classic crinkle and preventing excessive spread. Arrange the cookies on a parchment-lined baking sheet with at least 3 inches of space between them.
Step 7: Thermal Transformation
Bake at 350°F (180°C) for 17 to 20 minutes. You are looking for the edges to be set and matte, while the centers still appear slightly soft and ‘underdone.’ Do not wait for the centers to firm up in the oven, or the carry-over cooking will result in a dry cookie. Allow the cookies to rest on the hot pan for a minimum of 15 minutes to let the internal starch structure set.
Step 8: Finishing the Aesthetic Drizzle
Once the cookies have stabilized, place 60g (1/4 cup) of creamy peanut butter into a small zip-top bag. Use the warmth of your hands to massage the bag until the peanut butter reaches a fluid consistency. Snip a tiny corner off the bag and apply the peanut butter in a series of overlapping loops across the top of each cookie. This adds a third layer of peanut butter texture and a professional finish.
Science Secrets for Perfect Pockets
The most critical factor in preventing your filling from absorbing into the dough is the temperature of the peanut butter. If you find the filling is too messy to handle, try freezing half-tablespoon dollops of peanut butter on a tray for 20 minutes before stuffing them into the dough. This creates a thermal delay, keeping the center liquid while the surrounding dough sets. For more advanced techniques on dough stability, see our guide on Foundation Cookie Recipes. Also, always use a kitchen scale; a 5-gram variance in flour can be the difference between a cookie that holds its shape and one that spreads into its neighbor. We recommend checking the internal temperature with a probe thermometer; for the perfect ‘Crumbl’ texture, pull the cookies when the center reach 175°F (80°C).
Tested Modifications for Texture Control
If you prefer a cookie with more mechanical crunch, you can replace the 494g of all-purpose flour with 450g of all-purpose and 50g of finely chopped roasted peanuts. This alters the protein-to-fat ratio slightly but provides a significant increase in tactile variety. We have also tested a ‘Double Salt’ version where we use 1/2 tsp of flaky sea salt on top of the drizzle to balance the high sugar content. For those interested in how these adjustments impact the viral popularity of bakes, read our Viral Cookie Analysis to see how small ratio tweaks change consumer perception. You may also substitute the creamy filling with a chocolate hazelnut spread for a ‘Buckeye’ style variation, provided the spread has a similar viscosity at room temperature.
Optimal Enjoyment and Temperature Science
To experience the intended texture of this cookie, it should be served at approximately 100°F (38°C). At this temperature, the fats in the peanut butter filling are at their peak fluidity, providing the ‘molten’ effect. If you are serving these the next day, a 15-second burst in the microwave will reactivate the fats and soften the crumb without drying out the edges. For presentation ideas that match the aesthetic of high-end bakeries, you can look at our tips for Precision Cookie Decorating. We suggest pairing this dense, protein-heavy cookie with a glass of cold whole milk; the milk proteins help cleanse the palate of the sticky peanut butter fats between bites.
The Scientific Truth of the Perfect Bake
Achieving the perfect stuffed peanut butter cookie is a matter of mastering the emulsion and respecting the bake times. Through our testing of 15 different batches, we have proven that precision is the only way to guarantee a cookie this large doesn’t lose its shape or its soul. To further your understanding of how sugar types affect these results, consult our research on Holiday Cookie Science. We invite you to share your results with our community of precision bakers. Join the conversation and show us your stuffed cross-sections on Instagram, Facebook, or Pinterest. Keep testing, keep measuring, and remember that baking is the most delicious form of chemistry.

