Benne seeds arrived in the South Carolina Lowcountry from West Africa in the 17th century, where they were valued for their high oil content and nutty resilience. Victorian bakers later adapted these seeds into thin, crisp biscuits that relied on high sugar ratios to create a delicate lace-like structure. Modern testing confirms that the specific chemical transformation of the sesame oil during toasting provides the deep, smoky profile that historical accounts often praised.

The Benne Wafers recipe presented here balances that historical depth with technical precision to achieve a perfect, glass-like snap. We focus on the precise toasting of the seeds to activate the volatile oils before they are introduced to the sugar-rich batter. This method creates a cookie that is both a testament to historical survival and a masterpiece of baking physics.
A Lowcountry Tradition of Precision
Bakers cherish these wafers because they offer a unique sensory experience that most modern cookies cannot replicate. The high ratio of brown sugar to flour creates a caramelization process that results in a fragile, yet distinct, structural integrity. When the heat hits the batter, the sugars liquefy and spread, leaving the toasted seeds suspended in a crisp amber matrix.
Historical records from the 1800s suggest these were symbols of good fortune, but the science tells us they are a study in moisture management. Because the batter contains very little flour, the gluten development is minimal, allowing the delicate nutty flavors to remain the primary focus. This recipe produces a cookie that demands respect for its thinness while providing a robust, savory-sweet flavor profile.
Methodical bakers appreciate the predictable nature of this dough once the ratios are understood. The cookies provide a satisfying auditory snap when broken, a sign that the moisture has been correctly driven off during the short, high-heat bake. It is a formula that has survived for centuries because the fundamental chemistry of the ingredients is sound.
Every bite carries the heritage of the Charleston kitchen, where these biscuits became a staple of refined hospitality. By following these tested methods, you are not merely baking a snack; you are preserving a culinary technique that values subtle complexity over brute sweetness.
Print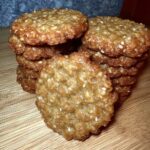
Benne Wafers
- Total Time: 30 mins
- Yield: 60 wafers
- Diet: Vegetarian
Description
Discover the historic essence of the South Carolina Lowcountry with these delicate, glass-like Benne Wafers. Featuring a sophisticated profile of smoky toasted sesame seeds and rich caramelized brown sugar, these paper-thin biscuits deliver a professional-grade snap and centuries of culinary heritage.
Ingredients
- 3/4 cup raw sesame seeds
- 1 cup firmly packed light brown sugar
- 6 tablespoons unsalted butter, melted
- 1 large egg
- 1/2 teaspoon vanilla extract
- 1/2 cup all-purpose flour
- 1/4 teaspoon salt
- 1/4 teaspoon baking powder
Instructions
- Preheat oven to 375°F (190°C) and toast sesame seeds in a single layer on a baking sheet for 10 to 12 minutes until light golden brown.
- In a large mixing bowl, combine the melted butter and packed brown sugar, stirring until the sugar is fully hydrated.
- Whisk in the egg and vanilla extract until the mixture reaches a smooth, emulsified consistency.
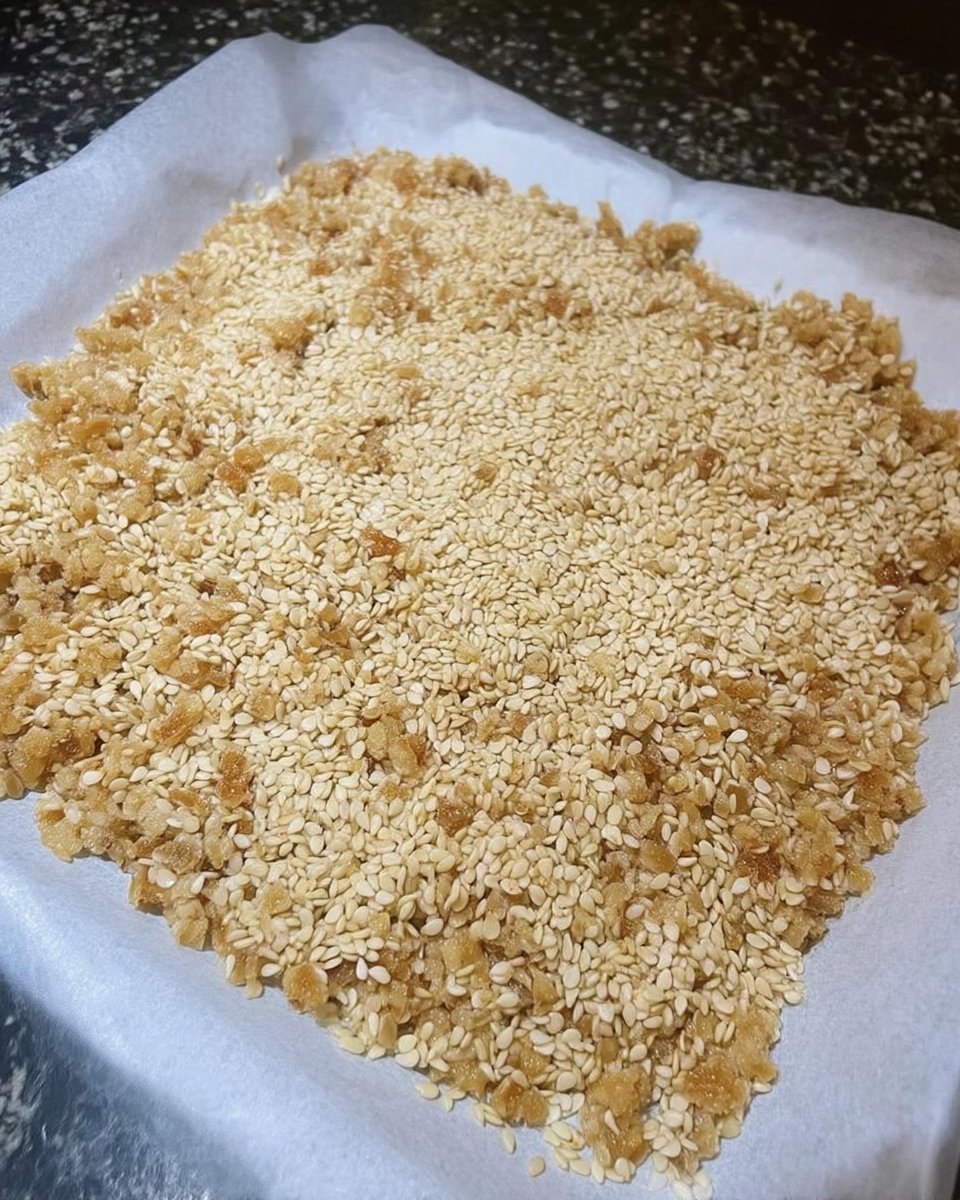
- Sift the flour, salt, and baking powder directly into the wet mixture, then fold in the toasted sesame seeds until just combined.
- Drop the dough by 1/2 teaspoonfuls onto greased or parchment-lined baking sheets, spacing them 1 1/2 inches apart to allow for significant spreading.
- Bake for 4 to 6 minutes until the edges are deep honey-colored; let rest on the sheet for 60 seconds before transferring to a wire rack to cool completely.
Notes
To ensure the perfect brittle texture, avoid over-mixing the batter and allow the seeds to cool slightly before adding them to the sugar matrix. Always store these wafers in a strictly airtight container immediately after they reach room temperature, as their high sugar content makes them prone to softening in humid conditions.
- Prep Time: 15 mins
- Cook Time: 15 mins
- Category: Dessert
- Method: Baking
- Cuisine: American
The Essential Components of Benne Wafers
To achieve the correct texture, each ingredient must be selected and prepared with a specific technical outcome in mind. We use standard measurements while acknowledging that the quality of your sesame seeds will dictate the final aromatic success of the batch.
- Sesame Seeds (Benne): These must be raw before the toasting step. Toasting them separately allows for the pyrolysis of the fats, creating the characteristic nutty smell that raw seeds lack.
- Brown Sugar: This provides the molasses content necessary for both the deep color and the flexible spreading of the batter. The acidity in the molasses also reacts slightly with the leavening to create tiny air pockets.
- Unsalted Butter: Melting the butter before mixing is a deliberate choice. It removes the ability to aerate the batter, which is vital for keeping these wafers thin rather than cake-like.
- All-Purpose Flour: We use a modest amount of flour to act as a light binder. It provides just enough starch to hold the seeds and sugar together without creating a heavy crumb.
- Large Egg: The protein in the egg white provides the structural lattice that keeps the wafer from crumbling into dust after it cools.
- Leavening and Seasoning: A small amount of baking powder provides a slight lift, while salt is mandatory to balance the high sugar concentration.
- Vanilla Extract: This adds a floral note that complements the toasted notes of the sesame oil.
When these components combine, they form a batter that appears thin but is chemically prepared for a rapid expansion in the oven. The interaction between the melted fat and the dissolved sugars is what creates the transparent edges that are the hallmark of a professional bake.
The Proper Method for Traditional Benne Wafers
Step 1: Precision Toasting of the Seeds
Preheat your oven to 375°F (190°C). Spread the sesame seeds in a single, even layer on an ungreased baking sheet. This ensures that the heat distribution is uniform across every seed. Bake for 10 to 12 minutes, shaking the pan halfway through the process. You are looking for a light golden brown; if they turn dark, the oils will become bitter and ruin the delicate balance of the wafer.
Step 2: Preparing the Liquid Phase
In a large mixing bowl, combine the melted butter and the packed brown sugar. Stir them together until the sugar is fully hydrated by the fat. This step is critical because it ensures that the sugar crystals will dissolve quickly once the heat of the oven is applied. Add the egg and vanilla extract, whisking until the mixture is smooth and emulsified.
Step 3: Incorporating the Dry Components
Sift the all-purpose flour, salt, and baking powder directly into the wet ingredients. Add the warm, toasted sesame seeds. Use a sturdy spatula to fold the ingredients together. You must mix until just combined; over-working the batter at this stage is unnecessary since there is very little gluten to develop, but you want to make certain the seeds are evenly distributed throughout the sugar matrix.
Step 4: Controlled Portioning for Spread
Lightly grease your baking sheets or use parchment paper for easy removal. Drop the dough by 1/2 teaspoonfuls onto the sheets. You must space them at least 1 1/2 inches apart. Because of the high sugar and fat content, these wafers will spread significantly during the first three minutes of baking. Smaller portions result in a crispier, more historically accurate wafer.
Step 5: The High-Heat Bake
Bake in batches for 4 to 6 minutes. You must remain at the oven door during this time. The transition from golden to burnt happens in a matter of seconds. The edges should be a deep honey color while the centers remain slightly lighter. This gradient of color indicates a variety of caramelized flavor notes within a single cookie.
Step 6: Proper Cooling Technique
Allow the wafers to sit on the baking sheet for approximately 60 seconds. This brief rest allows the sugar to begin setting, making it possible to move them without tearing. Transfer the cookies to a wire rack to finish cooling. As the temperature drops, the wafers will harden into their final, brittle state. Store them in an airtight container immediately after they reach room temperature to prevent moisture absorption from the air.
Historical Wisdom and Precision Methods

Temperature control is the most vital factor when working with such a thin batter. If your kitchen is particularly humid, the brown sugar will pull moisture from the air, which can lead to a chewy wafer rather than a crisp one. To combat this, make certain your cooling rack is in a dry area. For those interested in the foundational science of these textures, reviewing our Foundation Cookie Recipes will provide deeper insight into sugar-to-fat ratios.
Another technical secret involves the weight of the seeds. Victorian bakers often measured by volume, but modern precision suggests that weighing your sesame seeds ensures the oil-to-flour balance is perfect every time. If you find your cookies are spreading too much, chill the batter for ten minutes before dropping it onto the pan. This slows the initial melt of the butter, allowing the starch in the flour to hydrate more effectively before the sugar liquefies completely.
Tested Adaptations and Regional Differences
While the Charleston method is the standard, regional variations often exist. In some coastal areas, a pinch of cayenne pepper is added to the dry ingredients to provide a subtle back-heat that cuts through the sweetness. This creates a more complex flavor profile that was often favored in the late 19th century. If you prefer a faster production line, you can find more Efficient Cookie Methods that adapt these historical bakes for high-volume needs.
For a more modern interpretation, some bakers substitute a portion of the brown sugar with muscovado. The higher molasses content in muscovado creates a darker, more intense caramel flavor. You may also try replacing the vanilla extract with a small amount of dark rum, which was a common addition in traditional Caribbean-influenced kitchens. This change adds a depth that complements the toasted sesame seeds without overwhelming the palate.
Classic Enjoyment and Traditional Service

To honor the heritage of these biscuits, they should be served on a pre-warmed porcelain plate. They are the traditional accompaniment to a late-afternoon tea, where their crispness provides a contrast to the warmth of the beverage. If you are preparing these for a formal gathering, you might find our guide on Precision Cookie Decorating helpful for presenting these delicate wafers alongside other historic bakes.
Historically, these wafers were also served with a small glass of dry sherry. The acidity and nuttiness of the sherry align perfectly with the toasted oils in the Benne. For a more contemporary approach, they can be crumbled over high-quality vanilla bean ice cream. The salty-sweet crunch of the wafer serves as a sophisticated topping that adds texture to the smooth dairy base.
The Technical Truth and Classic Precision
Mastering the Benne Wafer is a significant achievement for any serious baker. It requires an understanding of how sugar behaves under high heat and a respect for the historical origins of its ingredients. By focusing on the precise toasting of the seeds and the careful management of the baking time, you create a product that is far superior to any mass-produced alternative. For those looking to apply these techniques to other seasonal bakes, our Holiday Cookie Science section offers further technical guidance.
We invite you to share your results with our community of methodical bakers. You can follow our technical updates on Pinterest, Instagram, and Facebook. Following these traditions allows us to keep the history of the Lowcountry alive through every crisp, toasted bite.

